GUIDE: Fitting a rev counter into a mk1 1.0/1.1
As some models of mk1 1.0 and 1.1 don't have a rev counter this can prove pretty annoying. I have the solution though, its quite easy too :P. I don't have any picture but look at the wiring diagram at the bottom of the page and will explain a step by step guide on how to do it.
1) First of all, you can either buy an aftermarket tachometer that can be placed anywhere you like. Option 2 is to buy some new dials (mine cost £20 from ebay) from a mk1 saxo. Think mine was from a 1.1sx as it doesn't have a temperature gage but just a light (basically its exactly the same as your original dials but it has a rev counter instead of the massive clock). Guide for replacing Dials - (scroll down for aftermarket Tachometer) 2) Unplug your battery and wait around 20-30 mins so the airbag can be removed (the airbag may go off if you do it straight away as it holds a charge). 3) Remove the steering wheel by this guide by Mark51 (great guide) http://www.saxperience.com/forum/sho...38#post2466438. 4) You will now see 5 plugs on the back of your dials, from left to right - green, blue, white, yellow and brown. You only need to unplug the yellow plug. 5) Now, with around 2-3m lenth of wire, feed this through the grommet under the passenger side dash. This can be found here under the dash, its a black rubber grommet than can be quite hard to remove (use a flat head screw driver and prise it out). If you use a torch you will easily see it. 6) Feed the wire through and then you will now see this wire in the engine bay (at the back of the bay on your right side). Pull through enough wire so it can be routed around the engine bay to your ECU. 7) With the battery still disconnected, you will see a silver clip keeping the ECU plug in place. Flick this from where it is towards the back of the car. Now it should become loose but you have to pull it out from back of the engine bay first as there are 'hooks' holding it in place at the front. Also, undo the wrap on the wiring so you can push the black housing up to gain access to the wires in Step 8!! 8) You will now see a small screw on the right side of the plug at the front, undo this and push a nail through the whole. The brown connection of the plug should now prise out and you will see the wires. Your looking for a bright green wire (there are a few) but your after the one that connects to PIN 6 (you can see the numbers on the brown connection block that the wires are connected into). 9) Locate PIN 6 and check the wire has number 425 on it. Now, cut this wire and strip each side. You can either use a connection block but I found it hard to put the ECU plug back together with this OR you can solder the 3 wires (solder the wire you put through into the engine bay to the cut green wires). I twisted them together first as its easier. Tape this all up now and push the brown connection block into the black casing. Took me a while to get how it works but I got it - just look at the housing first as one side of the brown block needs to go in before the other). 10) Put the screw back in and this is job done. Connect the ECU plug back to the ECU itself, and clip it black in with the silver clip. 11) You now need to go inside the car and feed the wire you've wired to the ECU behind the dash, I just fed mine to the steering column then up behind the dials (or to aftermarket tachometer). 12) Disconnect the yellow plug from the dials (second from right). You will see each PIN is numbered on this too (1-8). Splice into the brown wire connected to PIN 1 . I used a connector block for this, strip both sides of the cut brown wire and twist the wire coming from the ECU into one of the sides. Connect this to a connector block and remember to put the other end of the brown wire into this. 13) Put everything back in (dials, dial surround, indicator pannel, steering wheel, airbag etc. 14) Connect battery again and start the engine. You should now see the revs working. 15) Tidy up the wire in the engine bay and make sure its not touching anything that gets hot. Aftermarket Tacho Do steps: 2, 5, 6, 7, 8, 9, 10, 11, 14 and 15. Obviously just wire it to the tachometer if your not fitting complete dials. Job done!!! :afro:. This is a very detailed guide and no where near as complicated as it looks, took me around 30 minutes to do (but i'm a pro in removing my dials lmao!). Wiring diagram for reference: 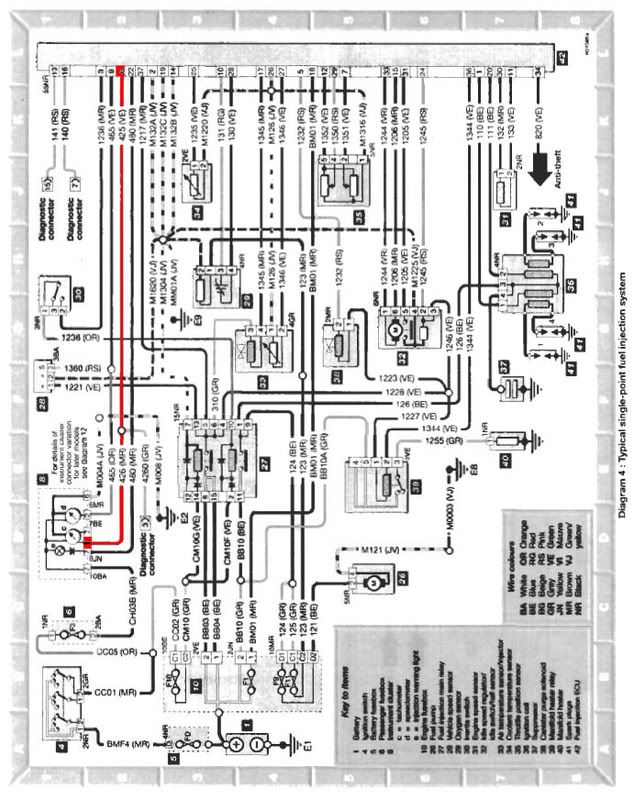 |
pics of aftermarket tacho?
|
Quote:
 |
This is amazing. Cheers :D
I now have life..  |
Quote:
|
Quote:
|
EDIT: never mind just read your reply to my thread! ill have a go! cheers!
|
RIGHT! THIS GUIDE IS RUBBISH!
haha no its not, but iv run into a snag. Can't get the bloody ECU plug out. The whole putting the nail in the hole thing has stumped me and i cant get it off its clips. Here's a pic just to show you what i mean if you dont already know... 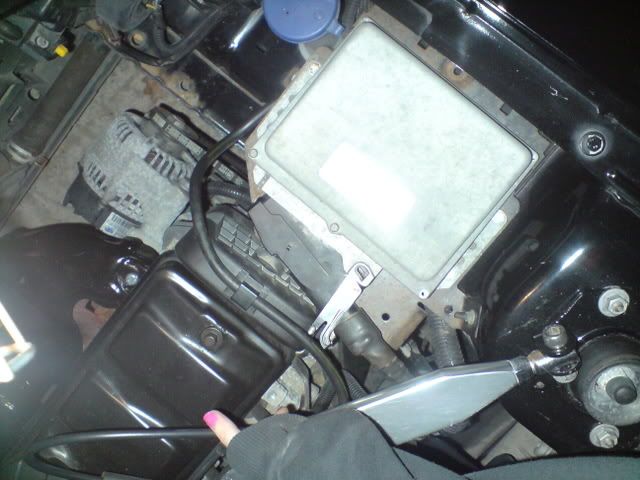 ^thats not my hand haha Also im checking this is the grommit your talking about yeah? 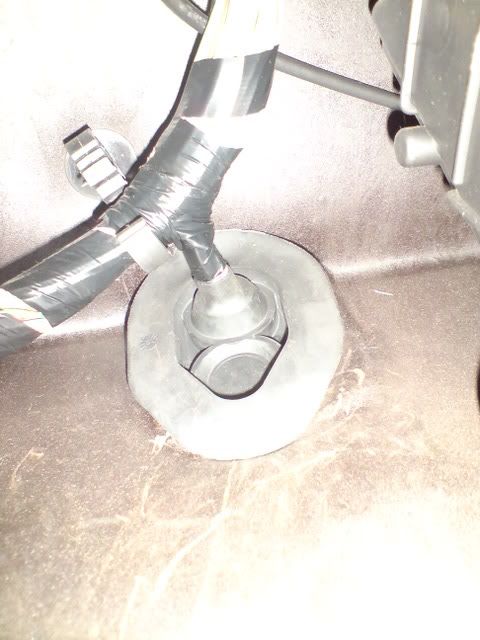 Any chance you could get a picture up of your ECU with the new wire in it, so i know what im aiming for. So any help with that would be super! Cheers mate |
Quote:
Sorry if that was just a big disorganised mess... maybe someone else can put it better :D |
a little bit of a mess lol but i appreciate the help. I probably wont get a chance to do this today, but i like to know what im doing before i start.
wait...just to check, you push the nail through after you've disconnected the plug? |
Quote:
You may be finding it difficult to take the plug out because you've already taken out the screw which holds it together.. i dunno. |
Quote:
|
finsihed fitting my rev counter today and for the record this guide is simply amazing!
top work yet again |
this doesnt work for me ,what am i doing wrong ? :(
im trying to use an aftermarket tachometer? |
Quote:
|
Hmm ok. Mines an Spi. 1.1?
|
Quote:
If you've found a green wire with the number 425 on it coming from pin 6 in the ECU then the problem must be somewhere other than the signal.. |
hmm you rekon so?
well we was doing it on my mates, but both the same engine and car basicaly :) was definatley green wire with 425 on it tho :) |
Quote:
I've got no experience with aftermarket tachos.. so i don't really know what you'd have to do. You've got the right feed wire though.. and that's the tricky bit :y: |
what u rekon the earth or something?
but surely if it was that then the thing wouldnt light up or do anything? |
| All times are GMT. The time now is 23:25. |
Powered by vBulletin® Version 3.8.2
Copyright ©2000 - 2025, Jelsoft Enterprises Ltd.