Mobile Devices: Lite Theme Citroën: Citroën Trader | Saxo Trader | C2 Trader Peugeot: Peugeot Trader | 106 Trader Enthusiast: Saxperience


Go Back   Saxperience - Citroen Saxo Forum > Citroen Saxo Related Forums > Saxo Engine/Performance
Register Member Photo AlbumsBlogs FAQ Calendar Experience

Saxo Engine/Performance If you're interested in tuning Saxo engines, or if you need to know something which is engine related... this is the place for you.

Reply
 
Thread Tools Display Modes
Old 30th December 2008, 01:54   #1
hudson701
Regular Poster
 
Join Date: Jul 2008
Location: Port Talbot
Posts: 279
Car(s): Citroen Saxo VTS MK2. Lotus Elise Series 2
hudson701 is infamous around these parts
Default Fitting a Raceland 4-2-1 Manifold to a Saxo VTS: A step-by-step guide

Fitting a Raceland 4-2-1 Manifold to a Saxo VTS: A step-by-step guide

Inspired by FincheySaxos VTR thread, I have put together a little guide for fitting a Raceland 4-2-1 Manifold to a Saxo VTS. This task should take you around 5 hours to complete but if you enjoy taking your time like me, then expect 6-8 hours split over two days. I carried out the job this past weekend (29/12/08). I hope you find the guide helpful as it took me a good few hours to write!

What you will need:

1 x Citroen Saxo VTS


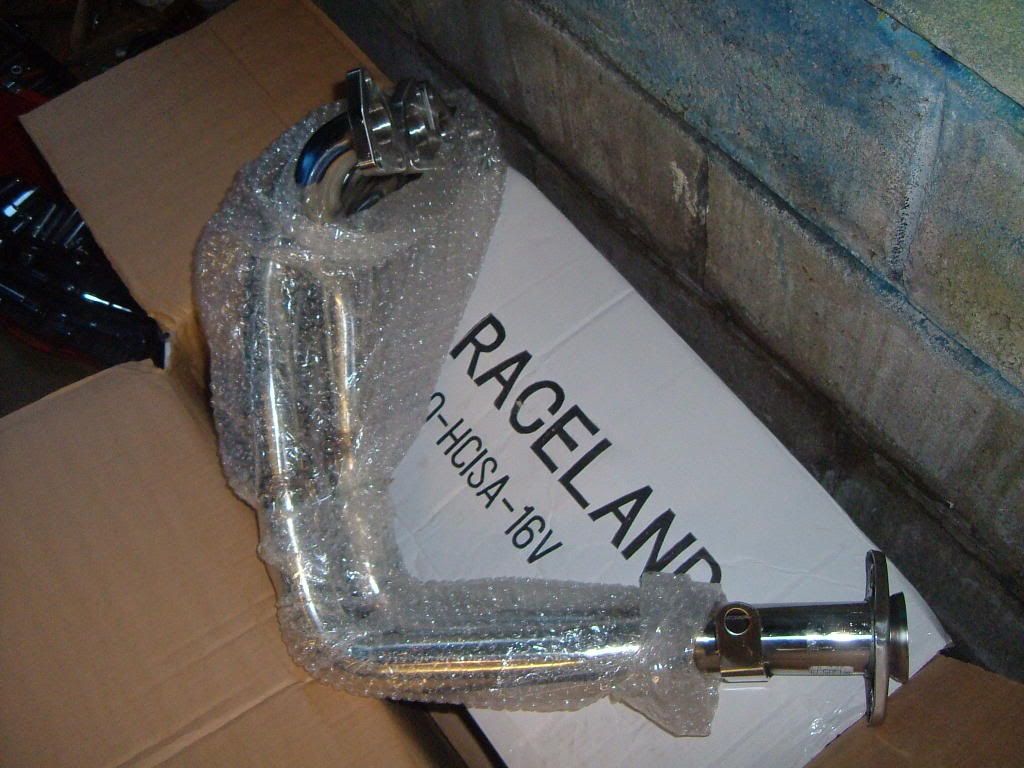
1 x Raceland Manifold


1 - 3 new manifold gaskets (although not essential)


Tools – at the very least you will need a 10mm open ended (OE) spanner, 10mm ring spanner, 13mm OE spanner, socket set with 10 and 13mm bits, axel stands (or a decent 2 tonne jack), copper grease, wire brush, WD-40 (or other lubricating spray)….

Fortunately, as my father is an engineer, I had access to excellent Snap-on® and Britool® tools including ratchet spanners, short and long OE spanners, a socket set which included bars of various lengths and a 3 tonne jack that hilted the car right off the floor! The variety of tools available made the job that little bit easier 

Removing the old Manifold

Using the appropriate spanner, remove the heat shield which will expose the old manifold. Give all the nuts on the manifold a good spraying to help loosen them and break the seal. Leave for half hour or so. If the manifold is stone cold, pour hot water over all the nuts/threads to help them expand – again to help break the seal. Believe me, the combination of WD-40 and hot water made it a piece-of-piss to remove the nuts and they came undone with virtually no effort at all. Preparation is the key here.


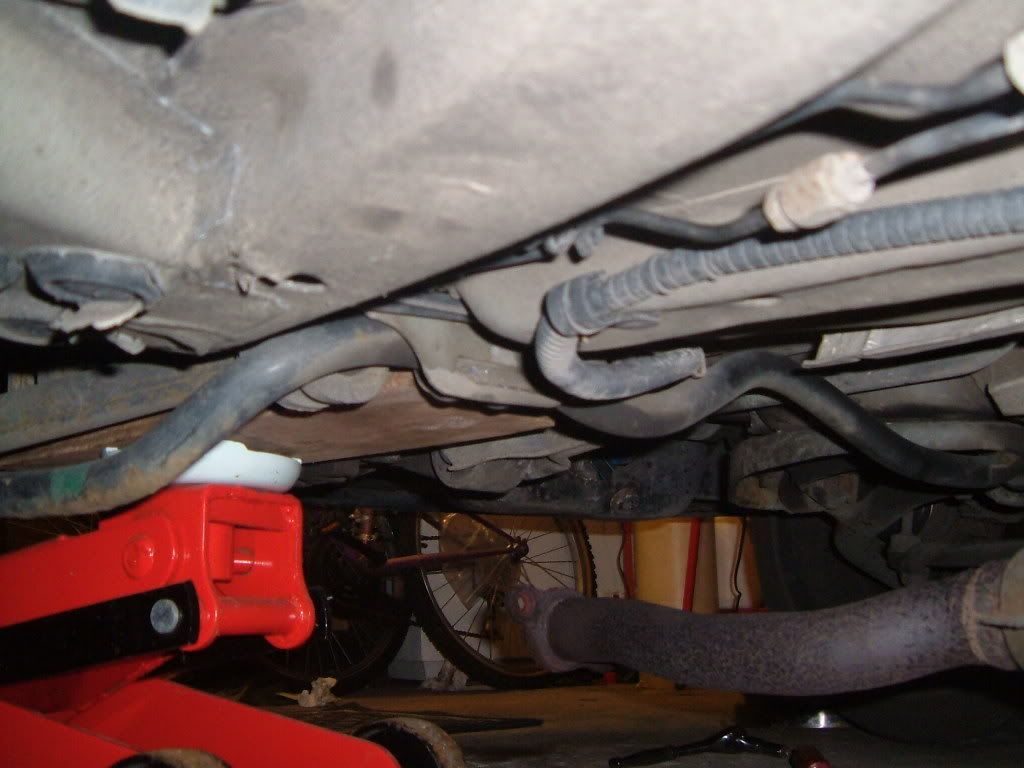
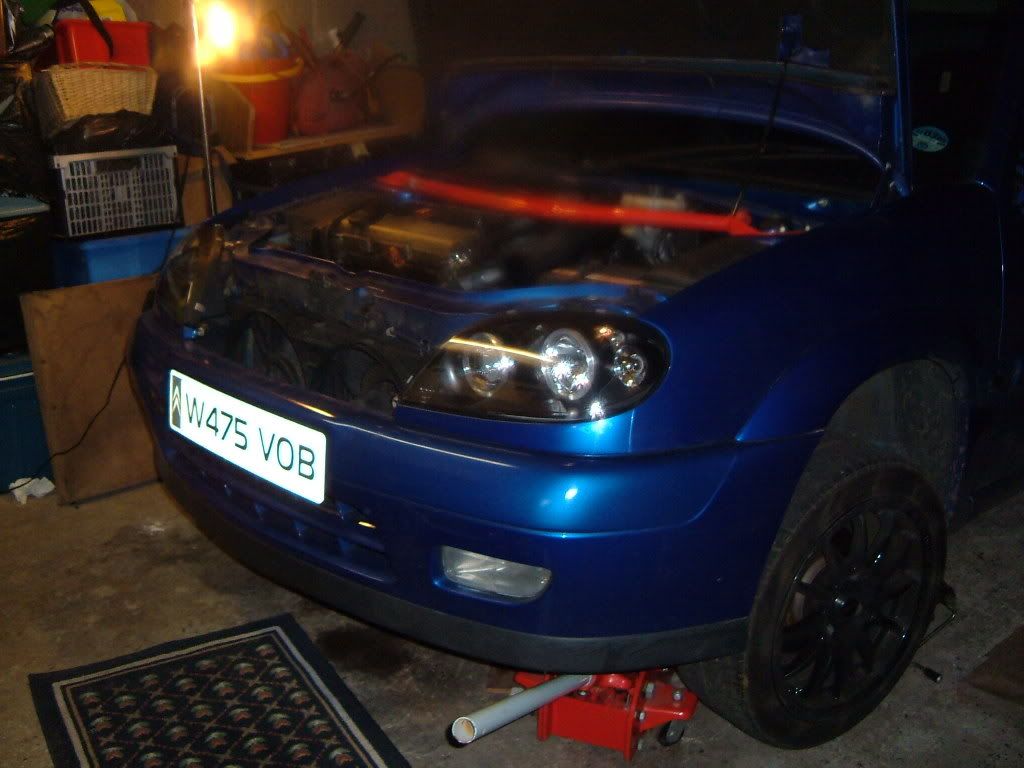
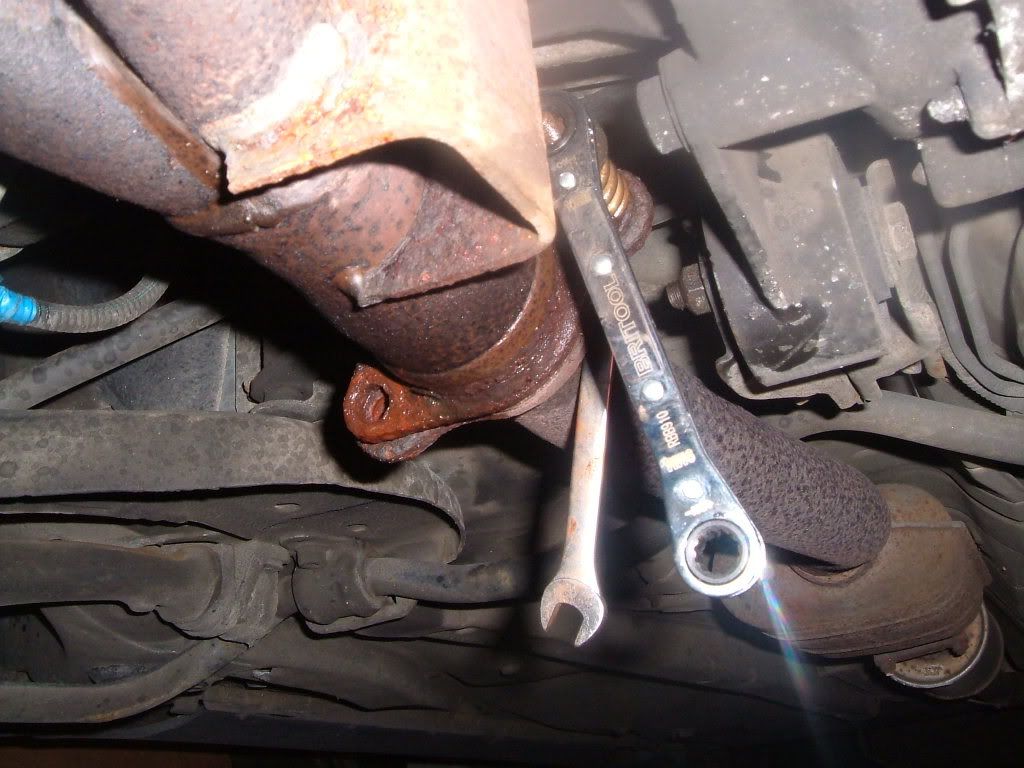
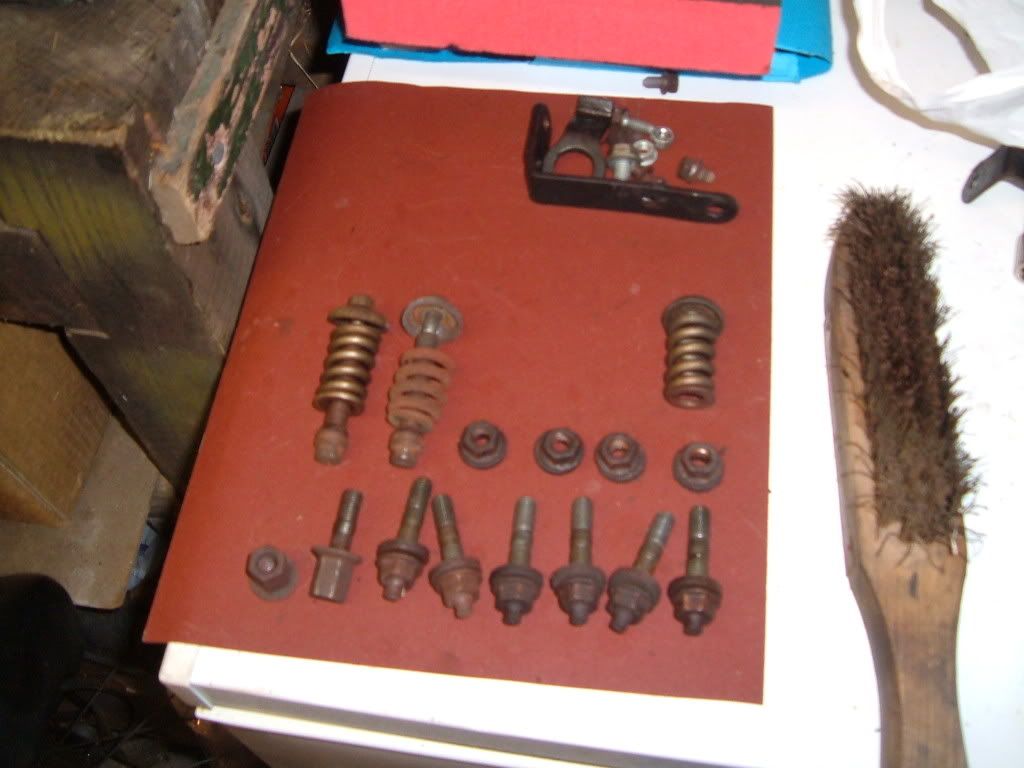
When ready unscrew each locking nut fixing the manifold to the head using the 13mm ring spanner and/or socket set where necessary. Once completed, move underneath the car and unscrew the 3 spring bolts holding the manifold to the exhaust. Again give the spring bolts a good spray before attempting to remove (note: the car will need to be jacked up or on axel stands in order to complete this task. I positioned a 3 tonne jack underneath the wishbone on the passenger side and used a piece of square wood atop of the jack to help distribute the load evenly – seek help if you are unsure of the location of a safe jacking point).


If you are having difficulty removing the spring bolts, using two ring spanners will help (see picture below). Once all the nuts have been removed the manifold should come away from the head and the exhaust quite easily. Carefully feed the manifold down so that it drops out underneath the car, and then detach the lamda sensor. The following pictures summarise:


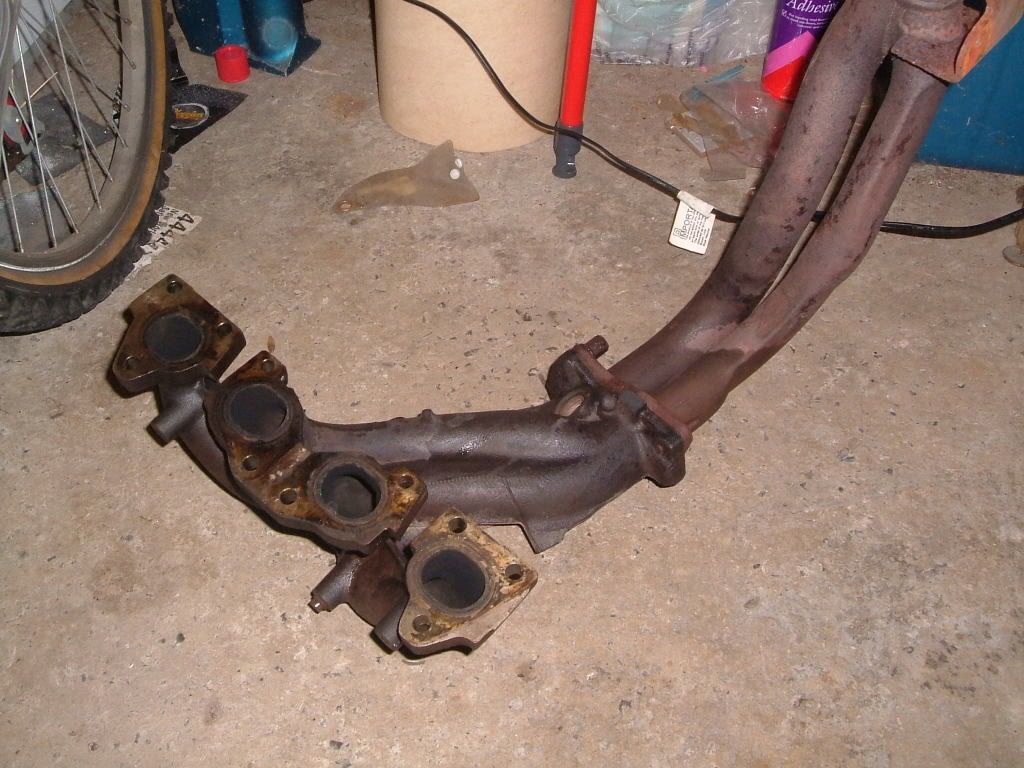
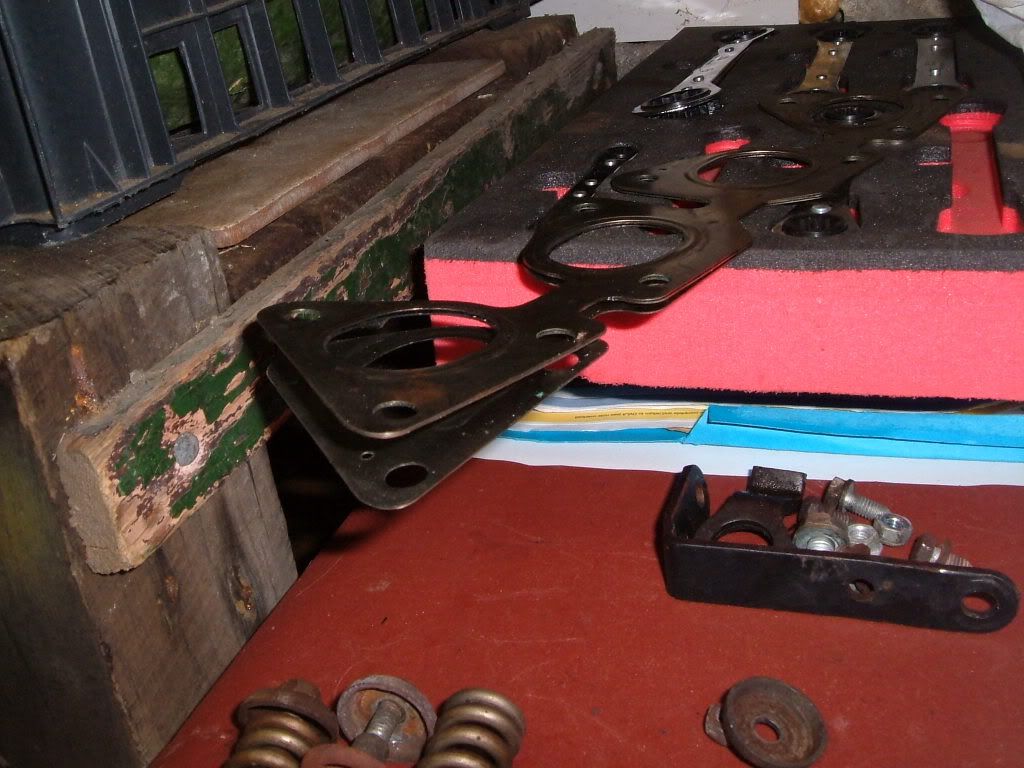
It is not absolutely essential but as a matter of best practice clean up all the nuts and bolts using a wire brush and/or emery paper. Apply copper grease liberally before re-fixing as this will make it easier to remove the new manifold if required at a later stage.


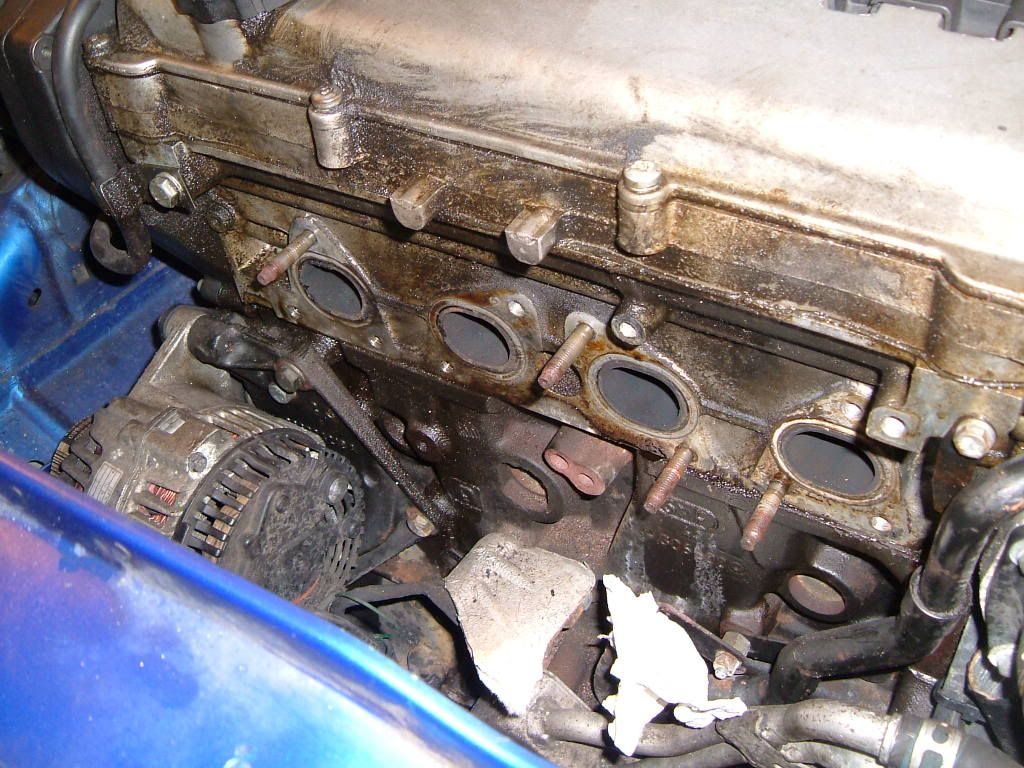
Clean all the dirt, grit and gunge from around the head and manifold gasket. Doing so is very important as it will help prevent the gasket blowing when the manifold gets hot. In my case the original gasket supplied appeared to be made up of three smaller gaskets – I simply cleaned each one in turn and fitted them back to the head. No need for new ones.

*** ***

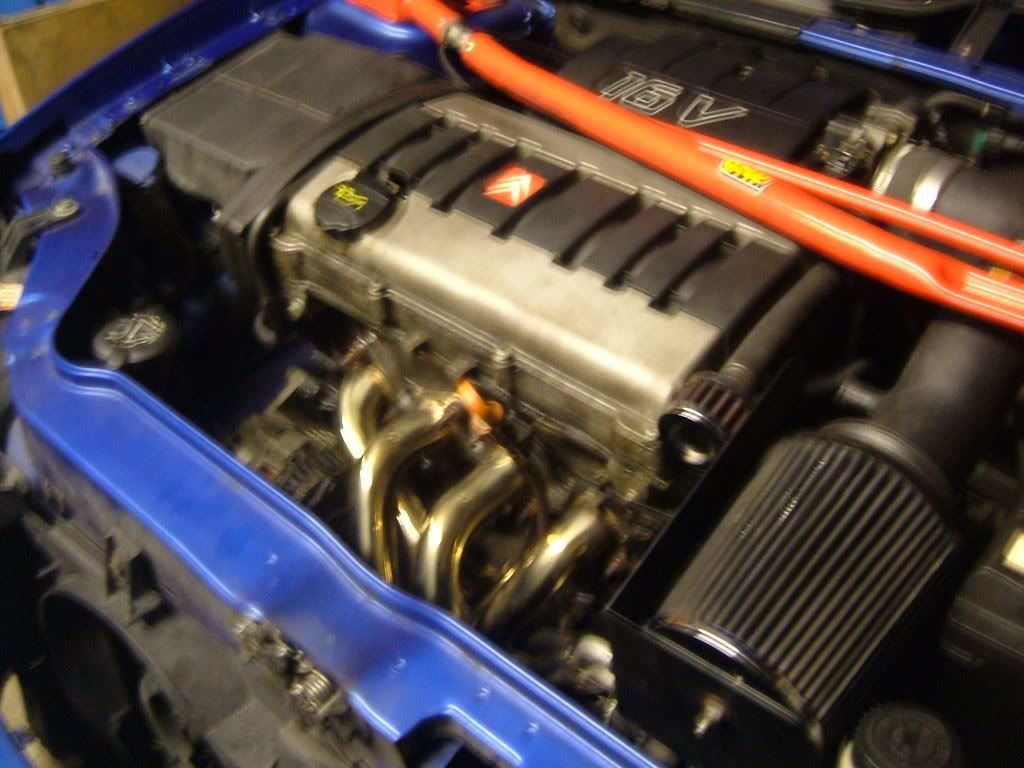
Fitting the Raceland 4-2-1 manifold

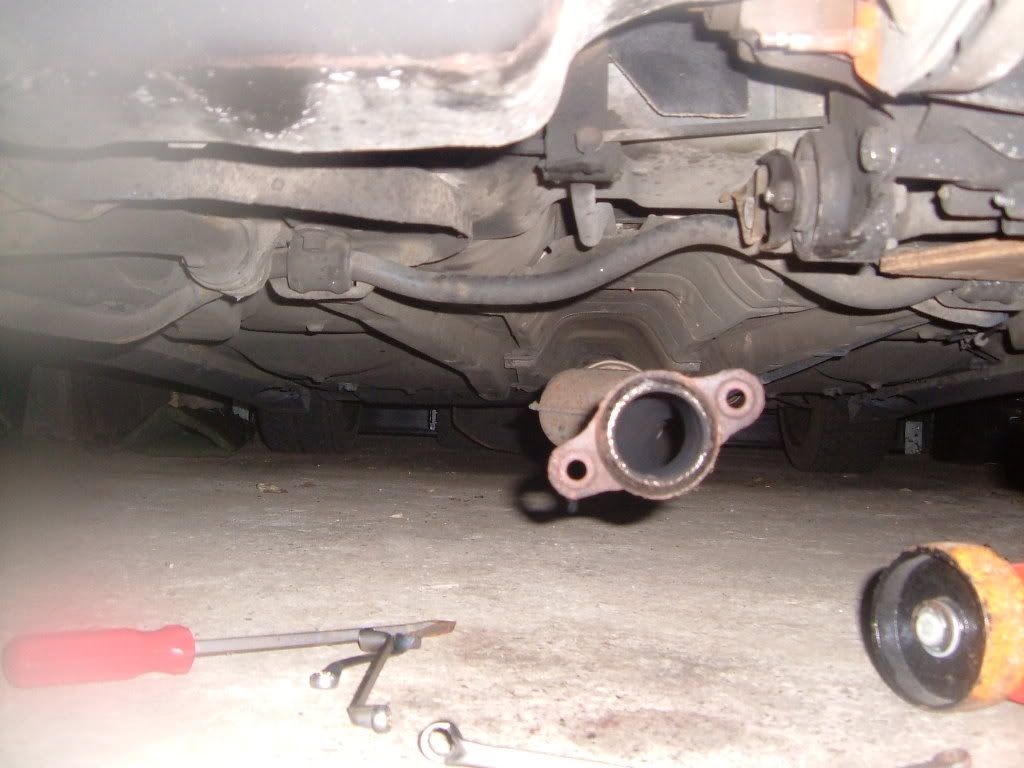
Once cleaned, re-fit the manifold gasket. Feed up the Raceland manifold through the engine bay and position over the threads. Hand-tighten each of the nuts but don’t do anything more at this point. Move underneath the car and hinge the manifold bracket over the gearbox mount. Refit the 3 spring bolts.


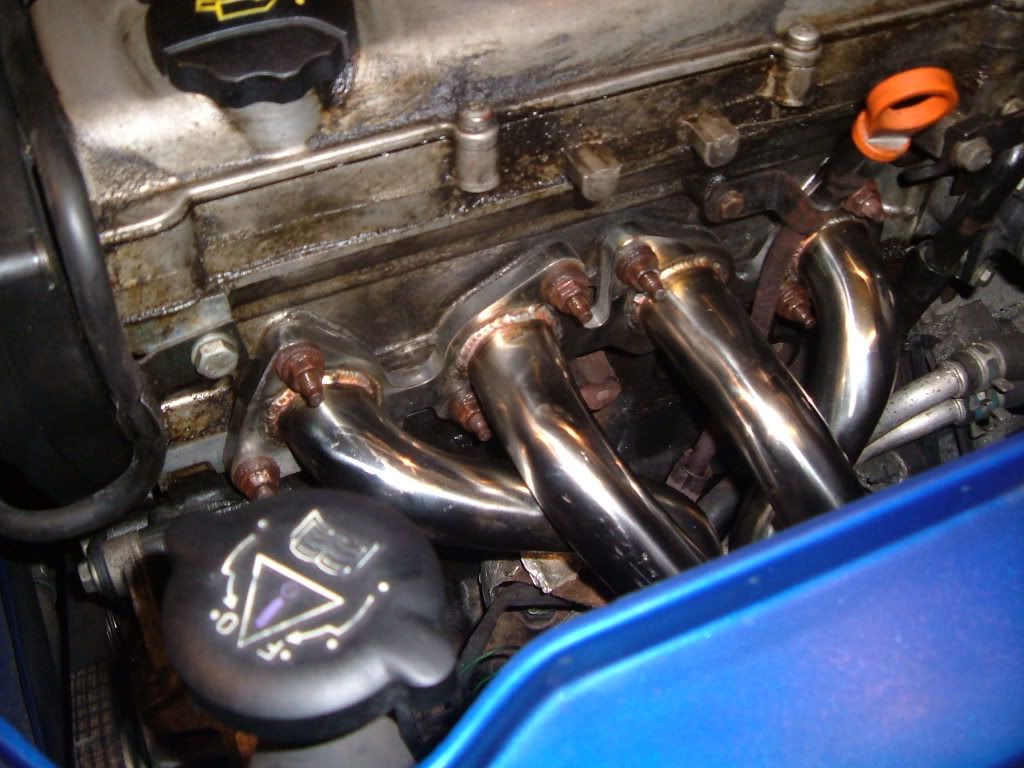
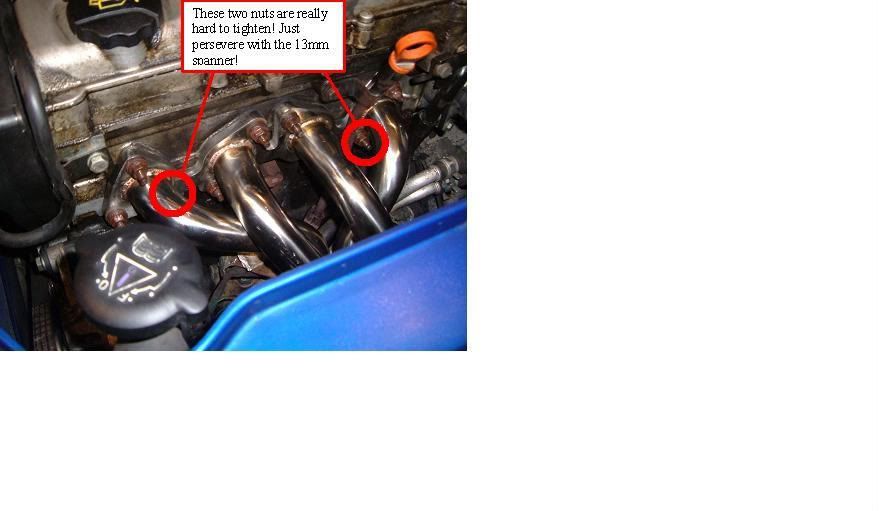
At this point all nuts attaching the Raceland manifold should be in place and hand-tightened. Beginning with the head bolts, tighten each one in equal increments until all are fully tightened. Two of the nuts are bastards to get back on (see picture below), just persevere with the 13mm ring spanner and you will get there in the end. This job took me around 2 hours because of a couple of troublesome nuts – make sure they are hand-tightened as much as possible in order to prevent the nut catching on the manifold branch come spanner-tightening time. The next task is to tighten the spring bolts at the manifold-exhaust interface. I recommend using an exhaust putty of some sort to seal the gaps (to prevent blowing) before tightening the spring bolts up.

Refit the lamda sensor to the manifold and plug it back in at the engine bay. Note: the lead is not too short! Simply feed it up the back of the engine and reconnect there – this will work no problem 

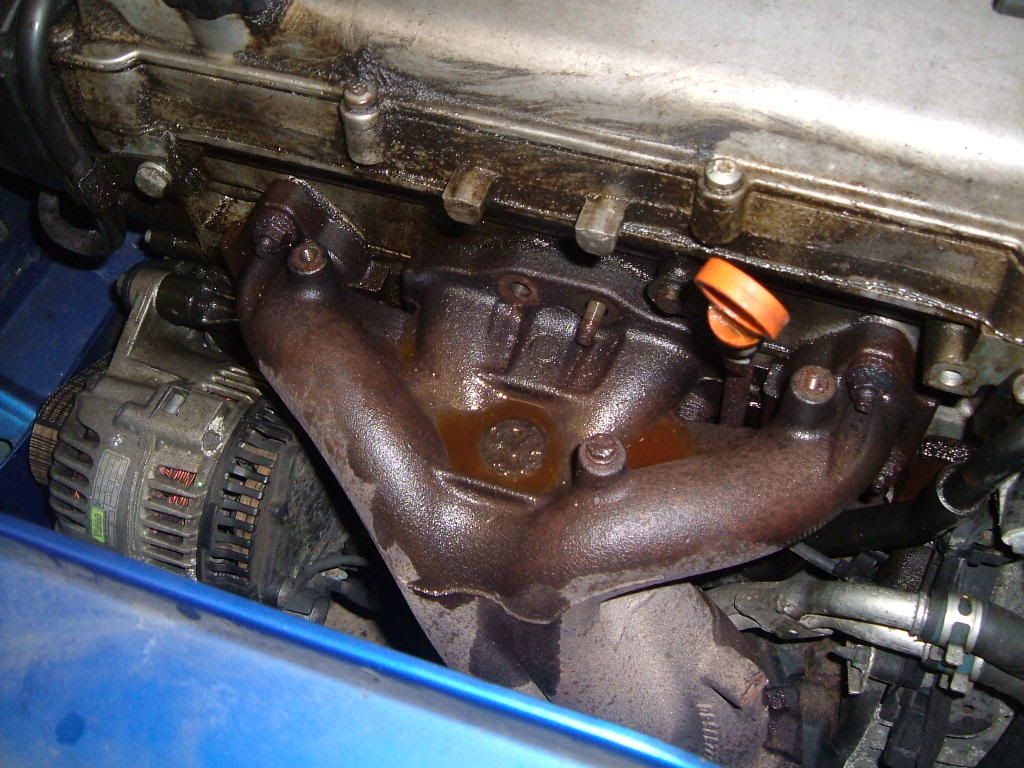
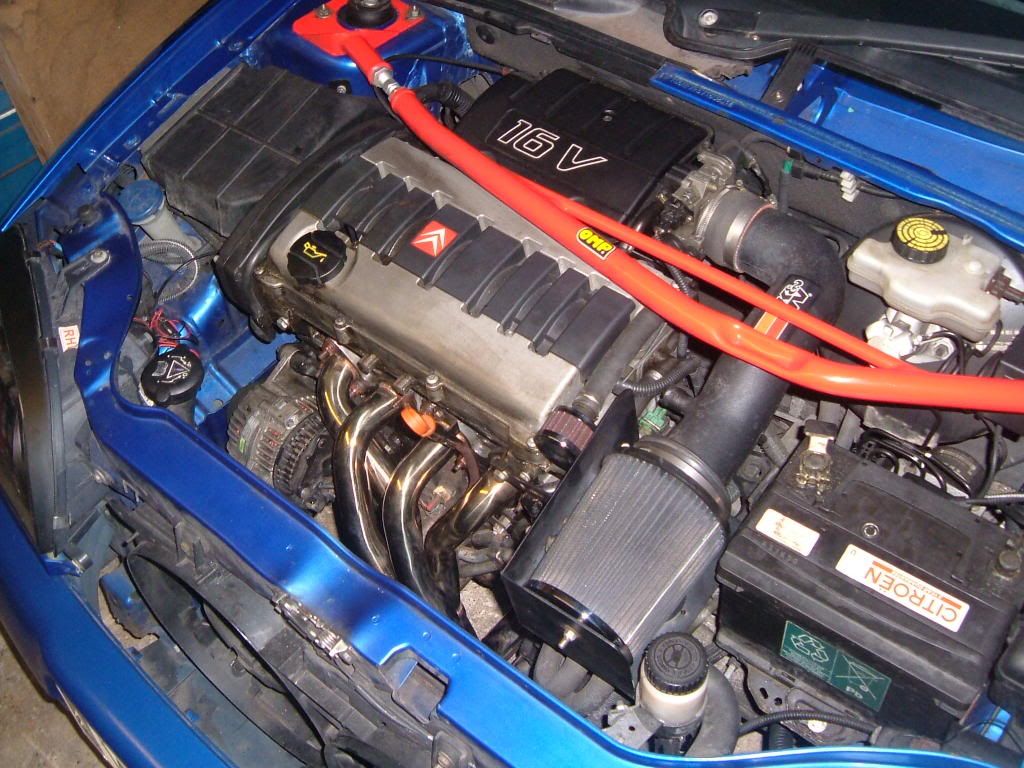
If all has gone well the finished product should look like this:


What can I expect from my Raceland 4-2-1 Manifold?

Noise (idling): A Powerflow exhaust and K&N Generation 2 induction kit were already fitted before the Raceland was added. These two modifications gave the rear of the car a fairly loud purring/humming sound on idling however the front (engine) sounded like a sewing machine due to various belts turning. You all know the sewing machine sound lol.

The Raceland has increased the overall volume at idling with the front now matching the back as having a nice burbling/purring noise. The ticking sewing machine can no longer be heard.

Noise (under acceleration): Raspy. Very raspy. And much louder, to the point that it is antisocial  and sounds a bit farty as well! lol I think this is because the manifold may be blowing somewhere (see my other thread) – I will get the car back into my garage shortly for further investigation.

Performance: What I am particularly impressed with at idling is the car revs much more freely. However under acceleration I have noticed a slight drop in performance. This may be down to the manifold/exhaust blowing somewhere. Again further investigation is needed.

Once the system is fully sorted I expect the noise levels to drop (especially the farty/raspy noise) and the performance (under acceleration) to improve slightly. At the moment I’m pressing the accelerator pedal and the throttle response is ‘sludgey’ – not acute or rapid enough. I’m pressing it down but the power ‘aint coming. There is a definite drop in power so there must be a leak somewhere.

Anyway I hope you find this guide useful when fitting your Raceland 4-2-1 manifold. If you have any questions please ask! Also if you can help with my problems (see separate thread) that would be much appreciated.

All the best people!
hudson701 is offline   Reply With Quote
The Following 12 Users Say Thank You to hudson701 For This Useful Post:
Old 30th December 2008, 09:25   #2
Luke
Saxperience Hardcore!
Yorkshire Region Member
 
Join Date: Dec 2005
Location: Bradford
Posts: 26,687
Blog Entries: 7
Car(s): '15 Focus ST-2
iTrader Score: 13 (100%)
Luke is absolutely fabulous!Luke is absolutely fabulous!Luke is absolutely fabulous!Luke is absolutely fabulous!Luke is absolutely fabulous!Luke is absolutely fabulous!Luke is absolutely fabulous!Luke is absolutely fabulous!Luke is absolutely fabulous!Luke is absolutely fabulous!Luke is absolutely fabulous!
Default

Very nice guide mate.

PM a moderator so this can be made into a sticky.
Luke is offline   Reply With Quote
Old 30th December 2008, 09:34   #3
peebee
Established Member
 
peebee's Avatar
 
Join Date: Jun 2004
Location: Worcester United Kingdom (England)
Posts: 2,209
Car(s): Saxo VTR MK2
peebee is on a distinguished road
Default

Good job matey! 10/10 for effort!
__________________
I like bodys, throttle bodys that is.....
My old girl

I guess theres meant to be a sig here somewhere!
peebee is offline   Reply With Quote
Old 30th December 2008, 11:20   #4
Pricklep
Saxperience Hardcore!
North East Region Member
 
Prickle's Avatar
 
Join Date: Mar 2008
Posts: 31,278
Car(s): Citroen Saxo VTS, S60 D5
iTrader Score: 2 (100%)
Prickle is a splendid one to beholdPrickle is a splendid one to beholdPrickle is a splendid one to beholdPrickle is a splendid one to beholdPrickle is a splendid one to beholdPrickle is a splendid one to beholdPrickle is a splendid one to beholdPrickle is a splendid one to behold
Default

Great guide
__________________
Quote:
Originally Posted by jeffchiz View Post
lol because you are a brand fag
Prickle is offline   Reply With Quote
Old 30th December 2008, 12:33   #5
Briton_VTR
L-plater
 
Join Date: Dec 2008
Location: Sunderland
Posts: 32
Car(s): Saxo VTR (x reg)
Briton_VTR is on a distinguished road
Default

top draw mate, al refer to this at a later date
Briton_VTR is offline   Reply With Quote
Old 30th December 2008, 16:24   #6
savo
Frequent Poster
 
savo's Avatar
 
Join Date: Apr 2008
Location: N. Ireland
Posts: 576
Car(s): BMW 328i Coupe with M3 diff
savo is on a distinguished road
Default

Excellant guide mate. My manifolds just cracked and i'll be buying a raceland very soon so this guide will be very usefull, thanks .
savo is offline   Reply With Quote
Old 30th December 2008, 16:37   #7
hudson701
Regular Poster
 
Join Date: Jul 2008
Location: Port Talbot
Posts: 279
Car(s): Citroen Saxo VTS MK2. Lotus Elise Series 2
hudson701 is infamous around these parts
Default

Thanks for the kind words!

I've just returned from two garages and both said the same thing - that the manifold is indeed blowing at the exhaust-manifold interface underneath the car. Apparantly I am missing a carbon ring which fits inbetween the manifold end and the start of the exhaust. They said the purpose of the ring is to maintain pressure between the two spring bolts ensuring there is no loss of power under acceleration i.e. so the two ends are not pulled apart on throttle causing a drop in pressure (blowing).

However I am still unsure about this. When I removed the original manifold there was no such carbon ring - just the manifold meeting the exhaust tube, held together by two spring bolts.

Could anyone help here or offer more information on what they were on about? How do I stop the Raceland blowing?
hudson701 is offline   Reply With Quote
Old 30th December 2008, 17:04   #8
Berg
Saxperience Forum Bum
West Midlands Region Member
 
Berg's Avatar
 
Join Date: Aug 2007
Location: rugby
Posts: 3,766
Car(s): MK2 VTS, Ibiza Cupra 20VT
iTrader Score: 19 (100%)
Berg is as cool as a cucumber!Berg is as cool as a cucumber!Berg is as cool as a cucumber!Berg is as cool as a cucumber!Berg is as cool as a cucumber!Berg is as cool as a cucumber!Berg is as cool as a cucumber!Berg is as cool as a cucumber!Berg is as cool as a cucumber!Berg is as cool as a cucumber!Berg is as cool as a cucumber!
Default

Quote:
Originally Posted by hudson701 View Post
Thanks for the kind words!

I've just returned from two garages and both said the same thing - that the manifold is indeed blowing at the exhaust-manifold interface underneath the car. Apparantly I am missing a carbon ring which fits inbetween the manifold end and the start of the exhaust. They said the purpose of the ring is to maintain pressure between the two spring bolts ensuring there is no loss of power under acceleration i.e. so the two ends are not pulled apart on throttle causing a drop in pressure (blowing).

However I am still unsure about this. When I removed the original manifold there was no such carbon ring - just the manifold meeting the exhaust tube, held together by two spring bolts.

Could anyone help here or offer more information on what they were on about? How do I stop the Raceland blowing?
thats a good guide mate

nice one

and yes i think there should be a ring in between where the downpipe joins the centre

i remember mine having one

its the big ring pictured here


http://www.kamracing.co.uk/manufactu...deac43bde49b82

Last edited by Berg; 30th December 2008 at 17:08.
Berg is offline   Reply With Quote
Old 30th December 2008, 17:13   #9
Harv
Saxperience Forum Bum
Track / Motorsport PrepNorth Wales Region MemberNorth West Region Member
 
Harv's Avatar
 
Join Date: Mar 2007
Location: Mold
Posts: 2,936
Car(s): EP3 Civic Type R
iTrader Score: 5 (100%)
Harv is absolutely fabulous!Harv is absolutely fabulous!Harv is absolutely fabulous!Harv is absolutely fabulous!Harv is absolutely fabulous!Harv is absolutely fabulous!Harv is absolutely fabulous!Harv is absolutely fabulous!Harv is absolutely fabulous!Harv is absolutely fabulous!Harv is absolutely fabulous!
Default

Good guide dude, very well written!!

You should definitely have a ring on there, looks like a wire/mesh kind of ring gasket that will stop the blowing. There only a couple of quid and will make the overall sound and performance much better. I havn't got a clue why you didn't have one on the original manifold to downpipe as you certainly should have done .
__________________
Saxo VTR Track beast

EP3 Civic Type R - soon to be JRSC'd
Harv is offline   Reply With Quote
The Following User Says Thank You to Harv For This Useful Post:
Old 30th December 2008, 18:47   #10
hudson701
Regular Poster
 
Join Date: Jul 2008
Location: Port Talbot
Posts: 279
Car(s): Citroen Saxo VTS MK2. Lotus Elise Series 2
hudson701 is infamous around these parts
Default

Well I jacked the car up and had a look underneath whilst it was running and sure enough I could see it blowing at the manifold-exhaust join. So I removed the two spring bolts and the original o-ring just crumbled away! Lol. I just bought a replacement which only cost me £4 from a motorfactors so will fit it this weekend. From what I understand the spring bolts must be really REALLY tight to ensure blowing doesn't occur. Basically the whole weight of the exhaust is directed through that join so its gotta be pretty tight. I think I'll support the weight of the exhaust on wooden blocks when tightening the spring bolts to get a good seal.

That picture helps above - what are the two washer-type pieces in the lower right-hand corner? I definitely do not have those...
hudson701 is offline   Reply With Quote
Old 30th December 2008, 21:16   #11
shaunyboy
Frequent Poster
 
shaunyboy's Avatar
 
Join Date: Sep 2008
Location: Manchester
Posts: 538
shaunyboy is on a distinguished road
Default

There called crush gaskets and if its missing it will blow its balls off, they have them on 50cc and 125 2 stokers and when its missing the noise level makes your ears bleed lol. Good guide tho mate.
shaunyboy is offline   Reply With Quote
Old 30th December 2008, 23:23   #12
r_i_c_h_1
Regular Poster
 
Join Date: Dec 2008
Posts: 305
r_i_c_h_1 is on a distinguished road
Default

Great post! But please edit it so it doesn't give the impression you can work under just a jack! Although they are physically strong and very reliable all thats stopping the pressure from being released is a single valve...
r_i_c_h_1 is offline   Reply With Quote
Old 31st December 2008, 16:12   #13
stoner75
Frequent Poster
 
stoner75's Avatar
 
Join Date: May 2008
Location: Bristol
Posts: 561
Car(s): None
stoner75 can only hope to improve
Default

great guide will deffinatly use this when i come to fit mine, a thanks to you!! im off to your other thread now, i wana know what the problem was lol
stoner75 is offline   Reply With Quote
Old 1st January 2009, 15:19   #14
Mark_Jordan
Infrequent Poster
 
Join Date: Dec 2008
Location: Wokingham
Posts: 236
Car(s): Citroen Saxo 1.1i 1998
Mark_Jordan is on a distinguished road
Default

will definatly use this mate, cheers
Mark_Jordan is offline   Reply With Quote
Old 1st January 2009, 17:37   #15
evans1089
Saxperience Post Whore
Content ContributorEast Midlands Region MemberYorkshire Region Member
 
evans1089's Avatar
 
Join Date: Jun 2007
Location: Chesterfield
Posts: 8,935
Car(s): Ibiza Cupra 204bhp
iTrader Score: 28 (100%)
evans1089 has much to be proud ofevans1089 has much to be proud ofevans1089 has much to be proud ofevans1089 has much to be proud ofevans1089 has much to be proud ofevans1089 has much to be proud ofevans1089 has much to be proud ofevans1089 has much to be proud of
Default

Great guide, but just realised you havnt shown how to move the oil filter inwhich you need to, to fit a raceland?
evans1089 is offline   Reply With Quote
Old 1st January 2009, 17:42   #16
CHIP
Saxperience Post Whore
 
CHIP's Avatar
 
Join Date: Apr 2007
Location: Mansfield
Posts: 6,663
Blog Entries: 3
Car(s): Astra Coupe Edition 100
iTrader Score: 12 (100%)
CHIP is an unknown quantity at this point
Default

Quote:
Originally Posted by evans1089 View Post
Great guide, but just realised you havnt shown how to move the oil filter inwhich you need to, to fit a raceland?
Thats only for the mk2 vtr isnt it? And you dont move it you fit a mk1 filter.
__________________
CHIP is offline   Reply With Quote
Old 2nd January 2009, 01:12   #17
evans1089
Saxperience Post Whore
Content ContributorEast Midlands Region MemberYorkshire Region Member
 
evans1089's Avatar
 
Join Date: Jun 2007
Location: Chesterfield
Posts: 8,935
Car(s): Ibiza Cupra 204bhp
iTrader Score: 28 (100%)
evans1089 has much to be proud ofevans1089 has much to be proud ofevans1089 has much to be proud ofevans1089 has much to be proud ofevans1089 has much to be proud ofevans1089 has much to be proud ofevans1089 has much to be proud ofevans1089 has much to be proud of
Default

Quote:
Originally Posted by CHIP View Post
Thats only for the mk2 vtr isnt it? And you dont move it you fit a mk1 filter.
well if you havnt noticed his saxo is a mark2 vts...
evans1089 is offline   Reply With Quote
Old 2nd January 2009, 01:39   #18
willsy
West Midlands
Track / Motorsport PrepWest Midlands Region Member
 
willsy's Avatar
 
Join Date: Nov 2005
Location: Nuneaton (West Mids)
Posts: 13,835
Blog Entries: 4
Car(s): '64 Volvo V40 R’Design, '89 Ph1 309 GTi, ‘97 Mk1 S
iTrader Score: 125 (100%)
willsy is absolutely fabulous!willsy is absolutely fabulous!willsy is absolutely fabulous!willsy is absolutely fabulous!willsy is absolutely fabulous!willsy is absolutely fabulous!willsy is absolutely fabulous!willsy is absolutely fabulous!willsy is absolutely fabulous!willsy is absolutely fabulous!willsy is absolutely fabulous!
Default

Great effort with the guide, nicely done.

Will certainly come in useful for a fair few people. Even better to see people more than ever having a go at fitting parts themselves
willsy is offline   Reply With Quote
Old 2nd January 2009, 17:53   #19
FinchysSaxo
Established Member
Central South Region MemberSouth East Region Member
 
FinchysSaxo's Avatar
 
Join Date: Dec 2006
Location: Buckinghamshire
Posts: 2,087
Car(s): Megane F1 R26 Liquid Yellow
iTrader Score: 6 (100%)
FinchysSaxo is just really niceFinchysSaxo is just really niceFinchysSaxo is just really niceFinchysSaxo is just really nice
Default

Good work mate, glad i inspired you
__________________
Shed FTW
FinchysSaxo is offline   Reply With Quote
Old 2nd January 2009, 18:22   #20
Finchowned
Frequent Poster
 
Join Date: Jul 2007
Posts: 810
Car(s): 2001 VTS
Finchowned has a spectacular aura aboutFinchowned has a spectacular aura about
Default

Fitted one of these to my VTS. Very straight forward. Just takes some logical thinking and a bit of time. Well worth it!
Finchowned is offline   Reply With Quote
Reply

Bookmarks


Posting Rules
You may not post new threads
You may not post replies
You may not post attachments
You may not edit your posts

BB code is On
Smilies are On
[IMG] code is On
HTML code is Off

Forum Jump


All times are GMT. The time now is 01:54.