| Saxo Brakes / Suspension / Transmission / Tyres If you have queries or information to share regarding Saxo braking, suspension, tyres or transmission systems, please discuss this within this forum. |
 |
|
 26th September 2011, 21:23
|
#1
|
|
Infrequent Poster
Join Date: Aug 2011
Location: Gwynedd
Posts: 184
Car(s): Saxo VTS | Defender 90 | Kawasaki ZX6R
|
 My guide to COMPLETELY removing gear stick play!
So I've done plenty of research and reading up on the Saxo gear linkage system, and having done quite a lot of work on my VTS today thought I'd put up some info and pictures to help anyone who had the same problem I did.
First off for anyone who isn't familiar with it, here's an overview of the Saxo gear linkage:

The reason there are so many problems with floppy gearsticks is that every single link and ball joint in the above diagram is prone to wear. The main culprits are normally:
The large circular bush on No. 1, Selection Bar Part No. 2414A7 £36.87 +VAT
The spherical nylon ball on No. 2, Control Return Part No. 244965 £37.19 +VAT
The socket cups on No. 4, 4 and 5, gear rods. Don't have a part no. for these as uprated replacements are widely available from the likes of Kam Racing/Pug1off from £39.00 which is cheaper than main dealer prices.
The upper No. 4 gear rod connects to a control arm on the gearbox. This is held onto a spindle in the box by a Roll Pin, Part No. 250924 £0.32 +VAT
Not normally in need of replacing, but the housing at the base of the gearstick can be replaced with a quickshift from the likes of Compbrake, GMC or, for a bit more money B&M. Although you'll be able to dramatically improve your gearchange just replacing standard items, my GMC quickshift has made my gearchange feel heavier and more solid compared to the standard housing, as well as obviously being adjustable to reduce the throw of the lever when selecting gears.
I've replaced all of the above on my car and it's made a massive difference, my gear change literally feels like brand new, it's smooth and slick and not notchy like it was before, with no movement from the gearstick once the car's in gear at all, whereas before I could wobble it side to side. I can confidently throw it into whatever gear I feel like without worrying about crunching or missing gears now, which is just what I wanted before I took the car on track.
Anyway enough talking, onto the pictures!
__________________
VTS PROGRESS THREAD! TEAM DYNAMICS PRO RACE 2 TOYO PROXES T1RS 60MM GMAX SHOCKS & SPRINGS 283MM BREMBO 4 POTS SPARCO STRUT BRACE MTEC DRILLED & GROOVED DISCS GMC QUICKSHIFT RACELAND & K&N INDUCTION MAGNEX STAINLESS SYSTEM
|

|

|
|
The Following 12 Users Say Thank You to Darkslider For This Useful Post:
|
12u55, ads85, BenTXC, Delboy, jonnyb2b, kmak577, logic_guy, LouisUK, maxwellvibe, SteveWC, tman, wardesaxoboy |
|
26th September 2011, 21:24
|
#2
|
|
Infrequent Poster
Join Date: Aug 2011
Location: Gwynedd
Posts: 184
Car(s): Saxo VTS | Defender 90 | Kawasaki ZX6R
|
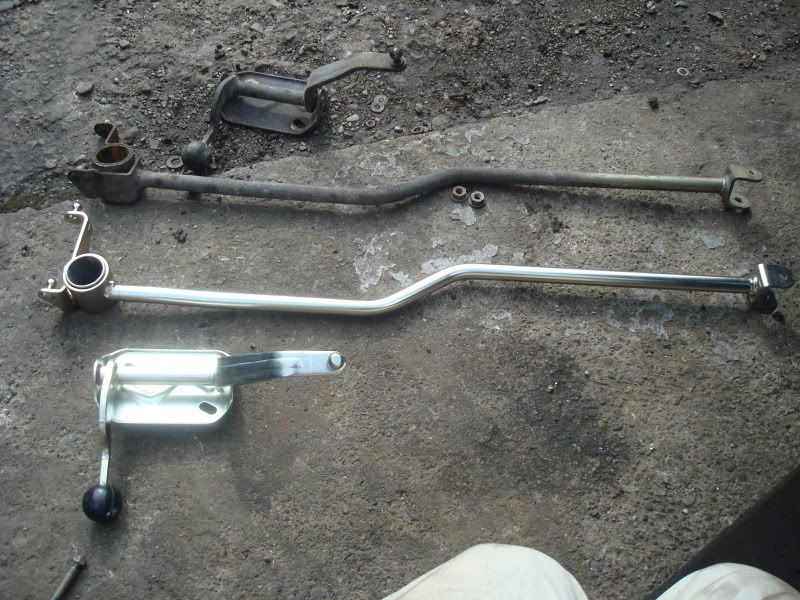
The first thing you need to do is establish what exactly needs replacing. These are the bits I fitted today, my GMC quickshift and Citroen parts. Still waiting for the uprated gear rods but they can be fitted after easy enough so won’t cover them in here.
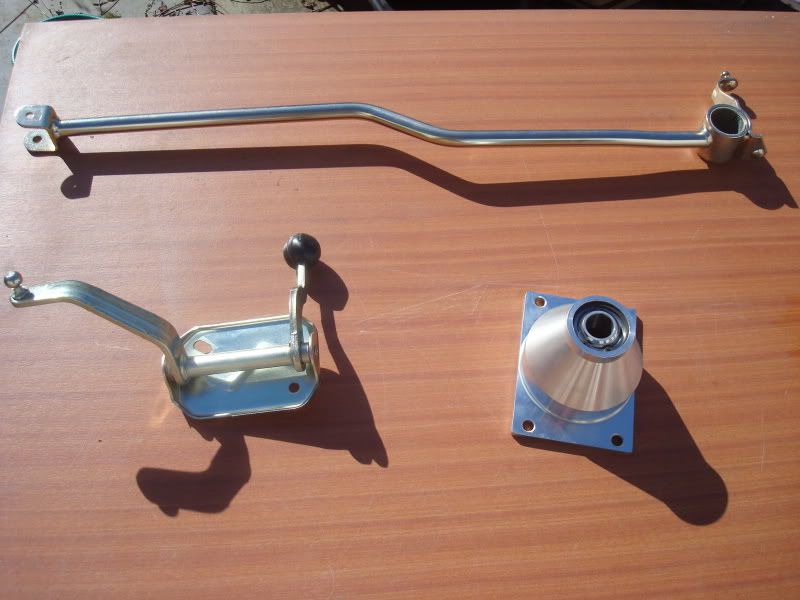
But you may not need all the bits I did, the only way to tell is by getting underneath and giving everything a good wiggle to see where the play is. If you’re unlucky like me and everything is shagged then you’ll need the lot!
So to start off with, I jacked the car up to a decent height and dropped it on sturdy axle stands under each wishbone. You don’t have to do this straight away as there’s a bit to do inside the car first but it’s up to you, I like to get it out of the way at the start. You want it to be this high really so there’s room to lie under it. Make sure the car’s solid and won’t drop on you, I always chock the rear wheels and give it a rock to check.
So inside the car:
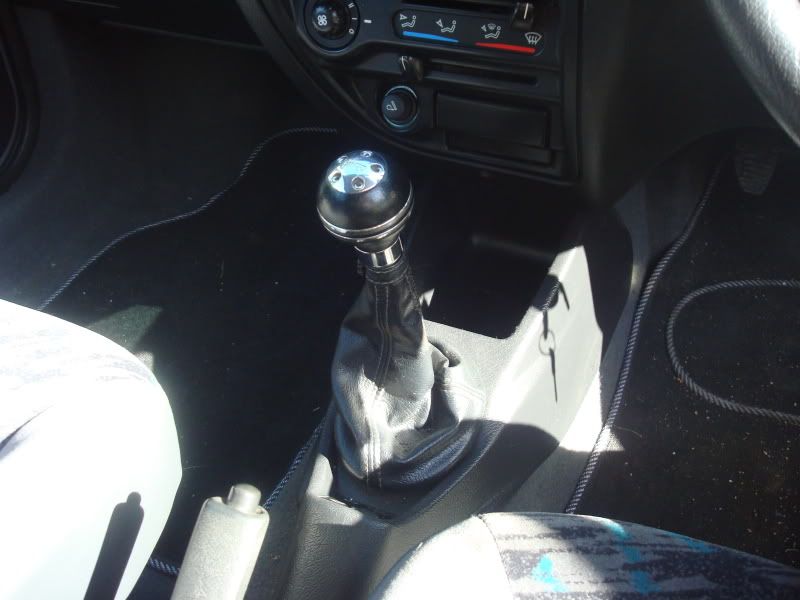
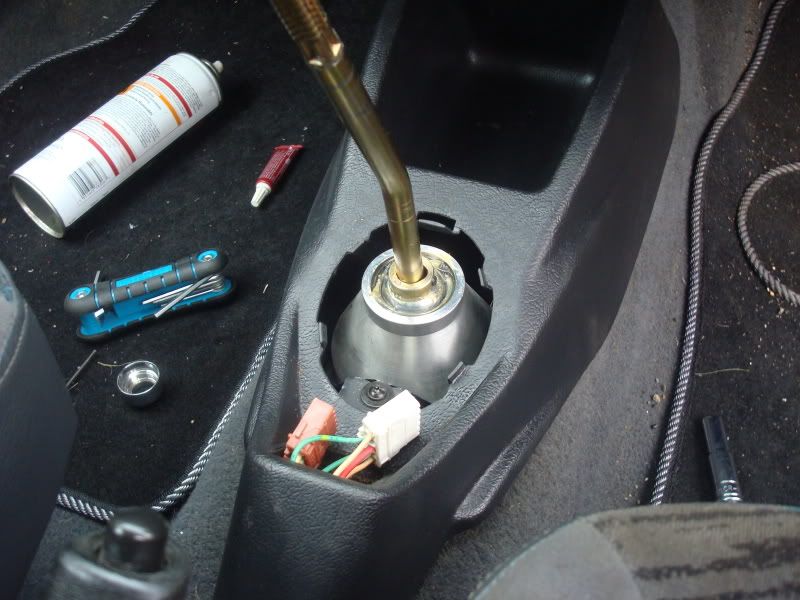
The gaiter around the gear stick can be unclipped from the centre console and lifted up, you can remove your knob at this point if you like but I left mine on as my gaiter had a pop button on it so I could pull it over the top. There’s a single T25 torx screw holding the console down, when this is unscrewed you can lift it up and pop the window switches out:
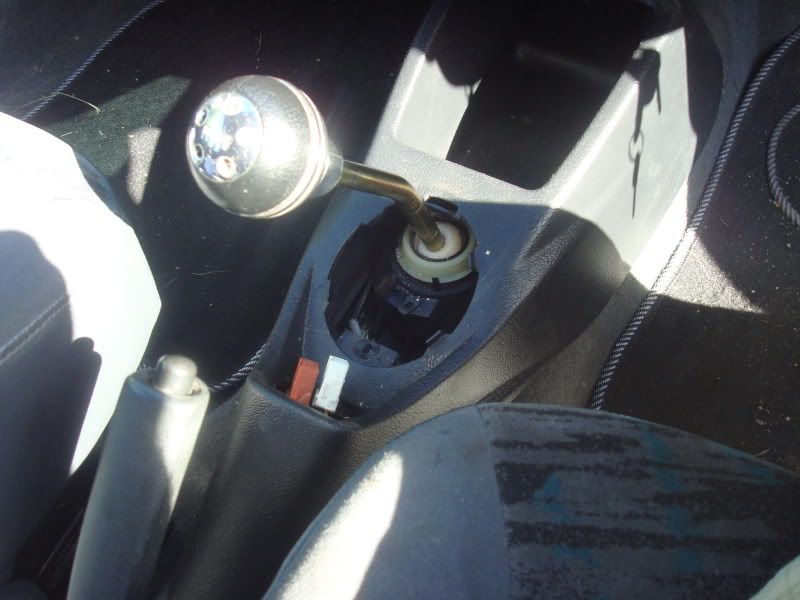
With the drivers seat all the way back and the handbrake down, the centre console just slides backwards to free it from under the dash, and can be pulled out between the handbrake and the seat.

The four 10mm nuts holding the lever housing down can be unscrewed, then the housing can be rotated enough to get at the pivot on the selector bar underneath:

A 10mm and a 13mm spanner will undo this, don’t drop the bolt underneath the car as it’s specially fitted to the pivot bush, it’s not a normal M8 bolt. Once that’s disconnected the lever will lift out.
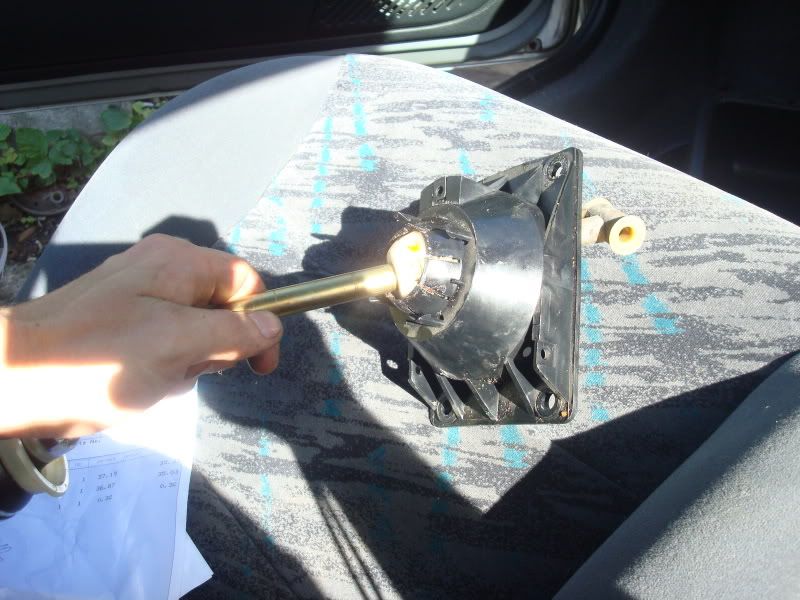
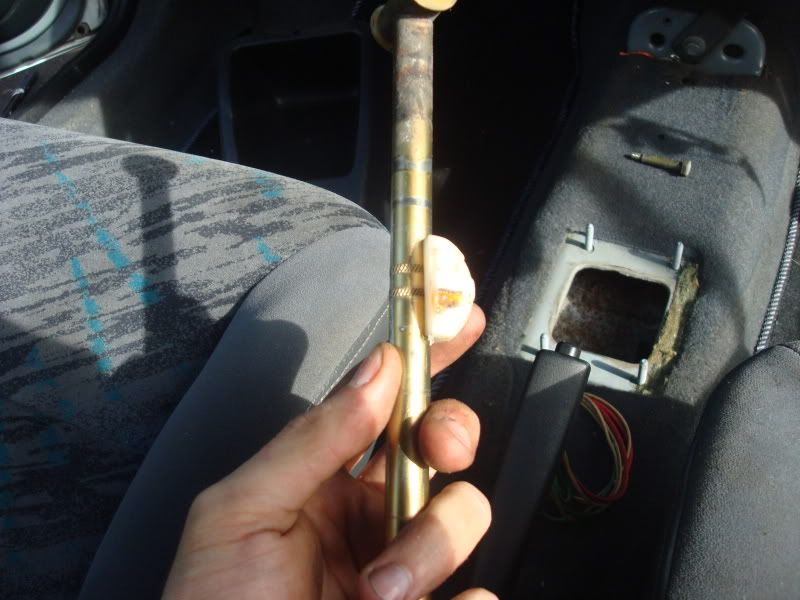
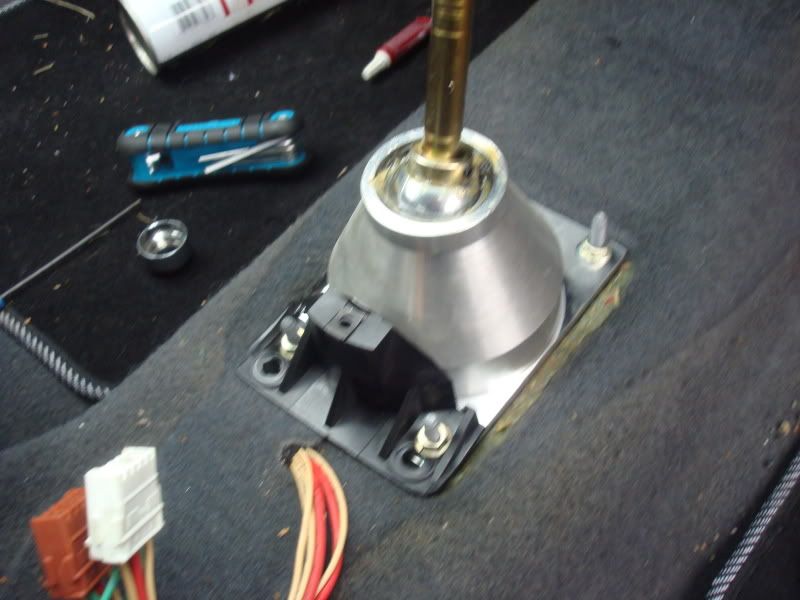
If you’re replacing this for a quickshift, you’ll need to unclip the plastic locking collar.With this done the lever can be pulled out of the black plastic housing, don’t throw away the old housing though you’ll need it later. You’ll notice the white nylon ball on the gearstick, this will need removing to fit the shaft in the quickshift if you’re fitting one. I used an angle grinder as it was the closest thing I had to hand, but a hacksaw will work just as well. A cut down each side of the ball and you’ll be able to split it with a screwdriver and pop it off.
At this point there’s not much else to do in the car, I stuck the quickshift together quickly just because I was impatient to see what it felt like, but the final adjustments will have to be made once everything else has been done.
__________________
VTS PROGRESS THREAD! TEAM DYNAMICS PRO RACE 2 TOYO PROXES T1RS 60MM GMAX SHOCKS & SPRINGS 283MM BREMBO 4 POTS SPARCO STRUT BRACE MTEC DRILLED & GROOVED DISCS GMC QUICKSHIFT RACELAND & K&N INDUCTION MAGNEX STAINLESS SYSTEM
|
|
|
|
|
The Following 3 Users Say Thank You to Darkslider For This Useful Post:
|
|
|
26th September 2011, 21:24
|
#3
|
|
Infrequent Poster
Join Date: Aug 2011
Location: Gwynedd
Posts: 184
Car(s): Saxo VTS | Defender 90 | Kawasaki ZX6R
|
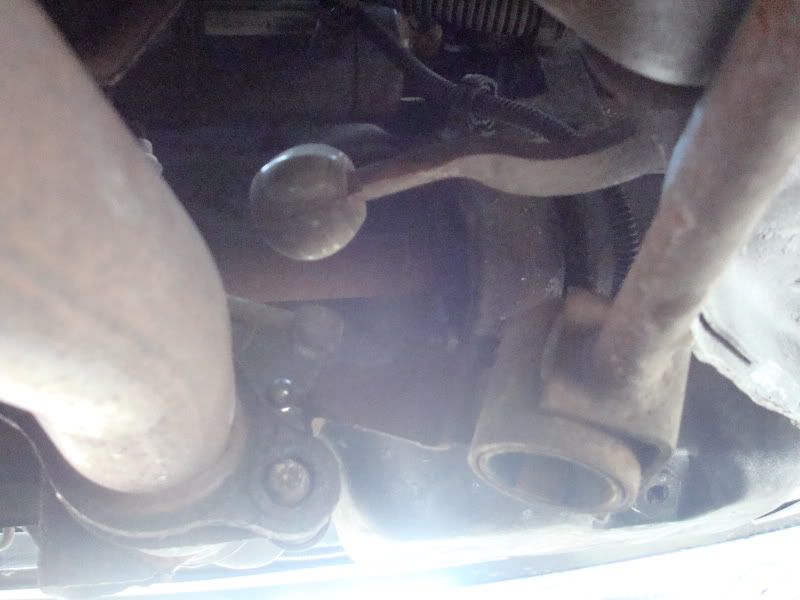
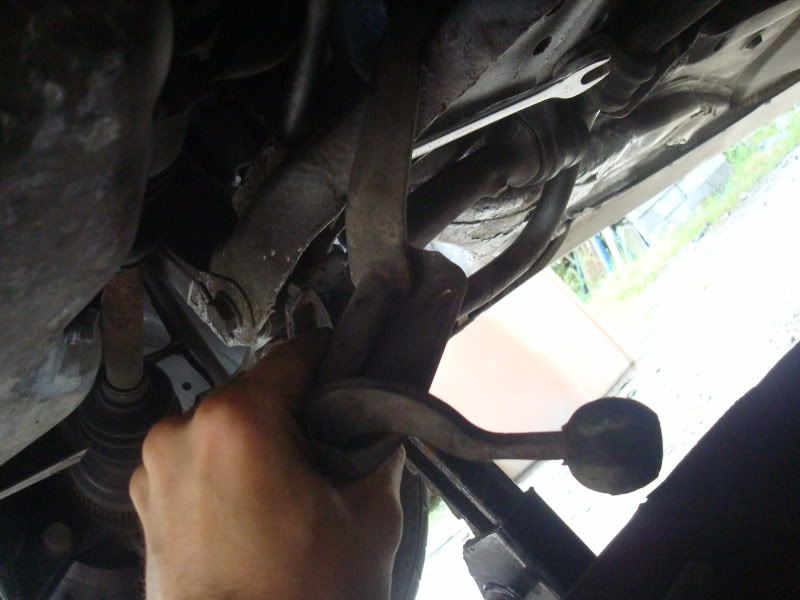
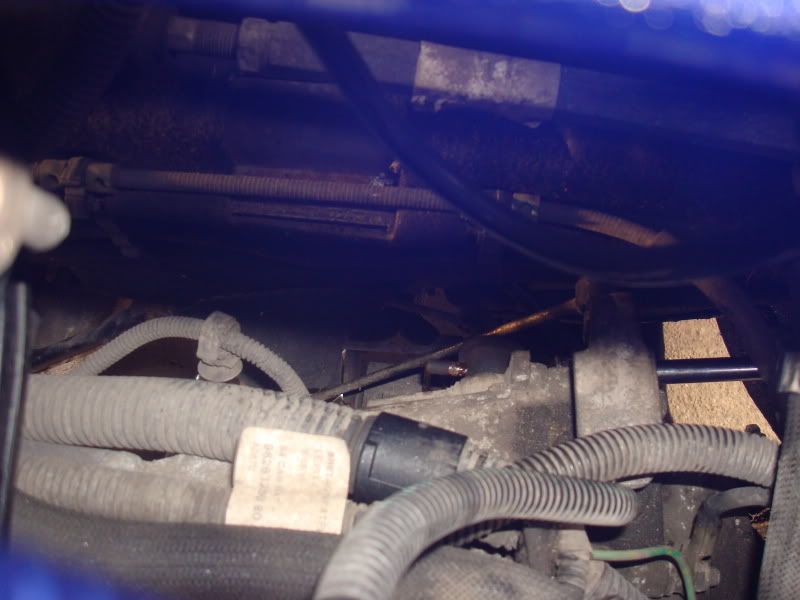
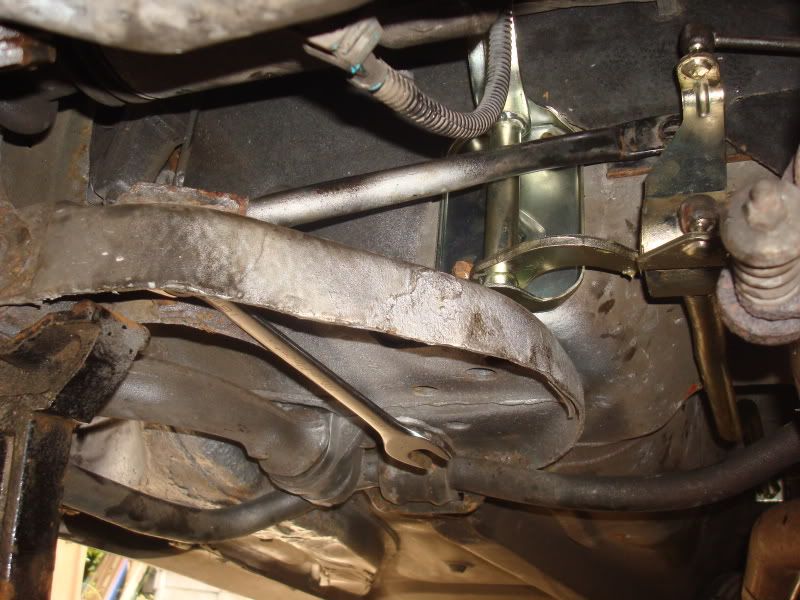
So underneath the car first thing I did was remove the exhaust heatshield. If you’re fussed about keeping this it’s probably worth squirting the fixings with WD40 or similar a little while before attempting to remove it, but every single stud snapped off on mine so I decided to bin the front section. I hope my Magnex system and decat won’t create as much heat as a standard system and cat so we’ll see. With the heatshield off you can see the base of the lever where it attatches to the selector arm. Mine was refitted from inside the car as I was playing with the quickshift but yours will already be disconnected here.
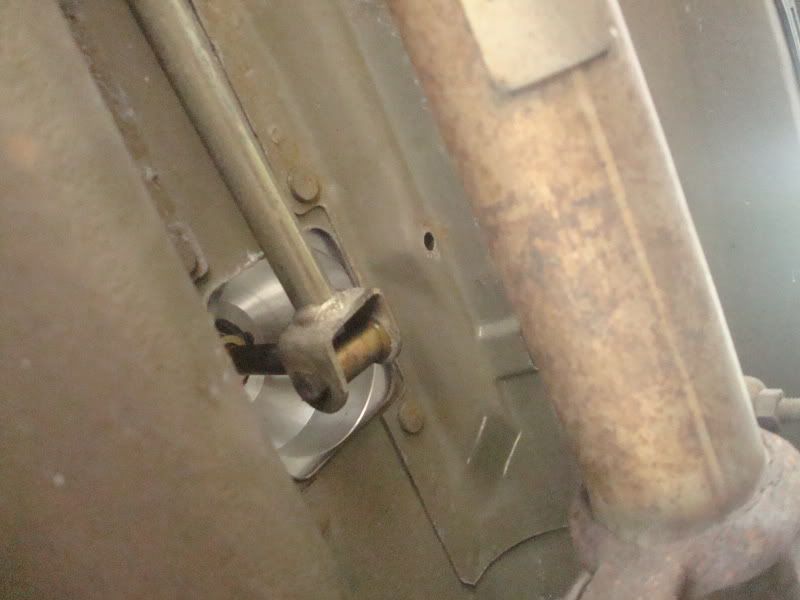
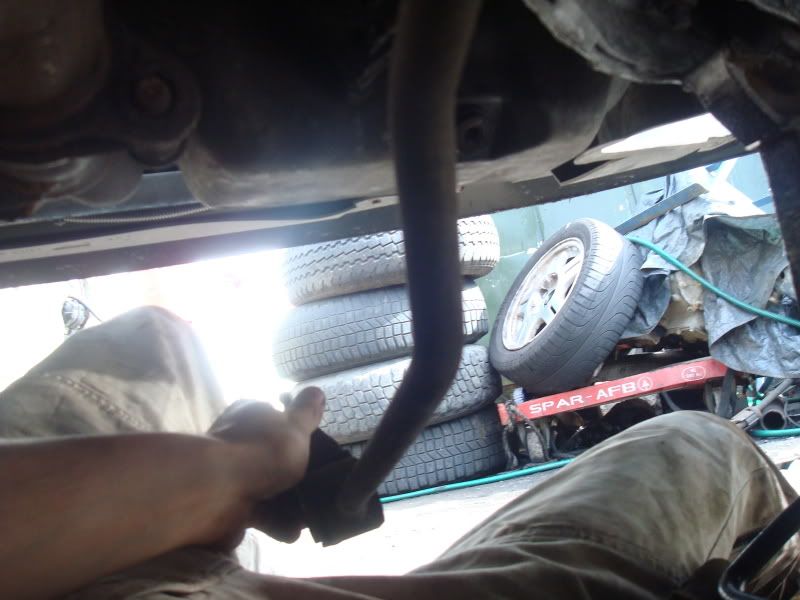
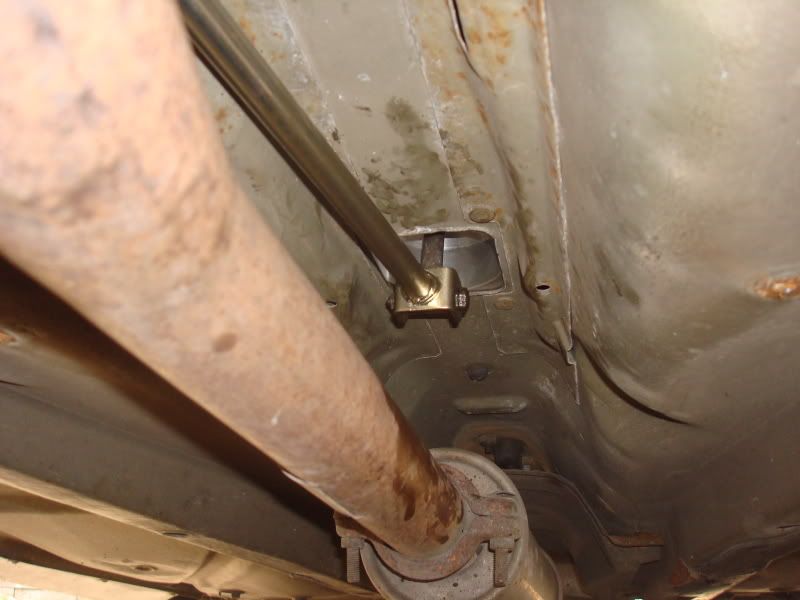
So once disconnected at the back, the only thing holding the front of the bar on is the gear rods. These can be popped off their sockets using an open ended spanner:
And the bar can then be slid off the nylon ball on the control arm:
And pulled out forwards underneath the engine:
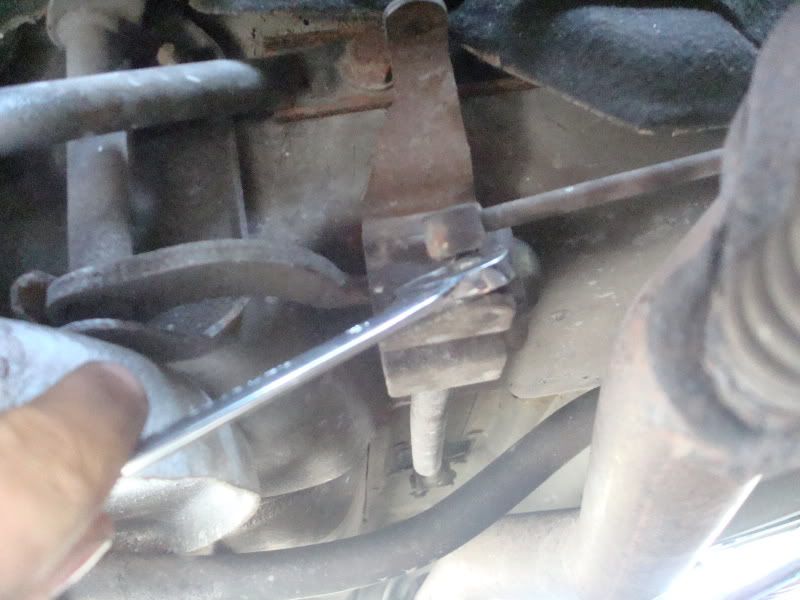
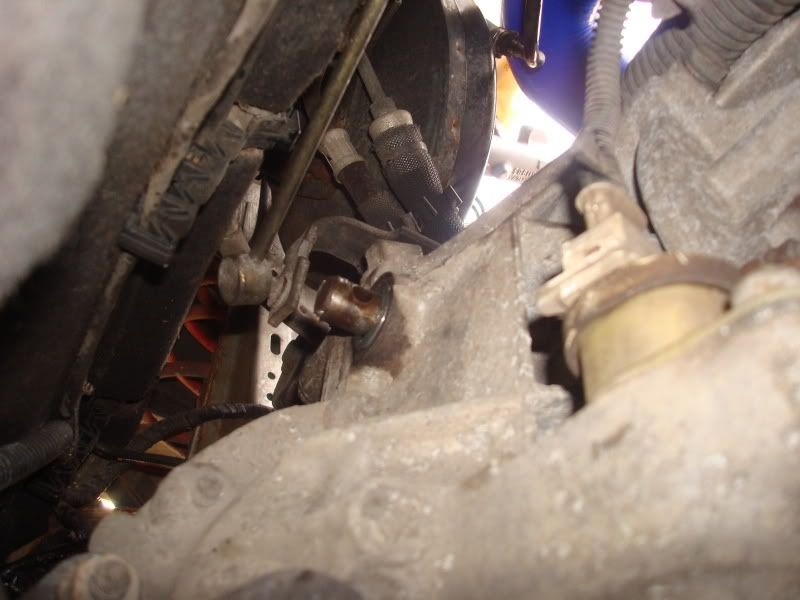
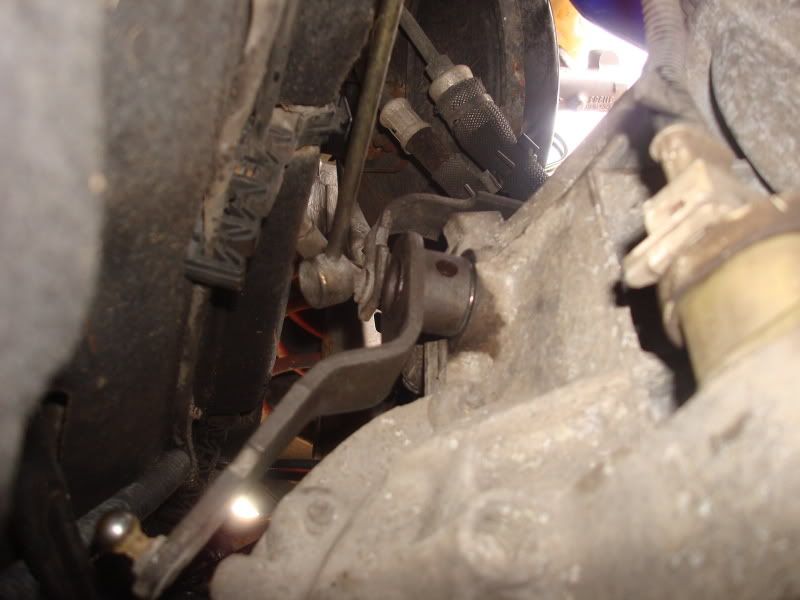
The control arm is held on with two 13mm nuts, one in each corner. There is a bracing strut to the top wishbone plate that needs to be moved first, the top bolt can be removed then if the bottom 16mm nut is slackened it can be pivoted enough to allow the control arm to be unbolted and removed:
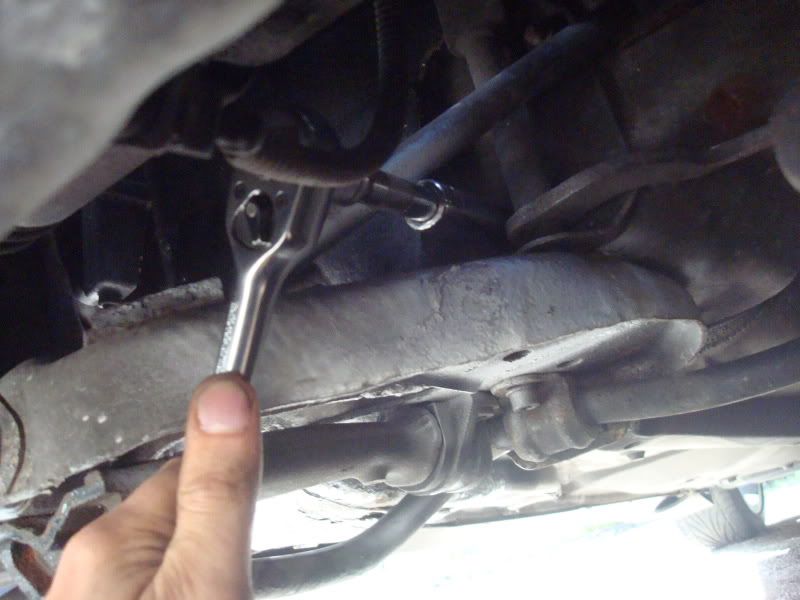
Then there’s enough space to manoeuvre it out:
The old vs the new, the new nylon ball fits into the new bush nice and snug with no movement whereas the old ones had half an inch of play!
Before putting them back on, I decided to change the roll pin in the arm on the gearbox next while I had extra room. If you’re lucky and your arm has no play in it you won’t need to do this, but it wears on 99% of Saxos so chances are yours will be gone too!
__________________
VTS PROGRESS THREAD! TEAM DYNAMICS PRO RACE 2 TOYO PROXES T1RS 60MM GMAX SHOCKS & SPRINGS 283MM BREMBO 4 POTS SPARCO STRUT BRACE MTEC DRILLED & GROOVED DISCS GMC QUICKSHIFT RACELAND & K&N INDUCTION MAGNEX STAINLESS SYSTEM
|
|
|
|
|
The Following 5 Users Say Thank You to Darkslider For This Useful Post:
|
|
|
26th September 2011, 21:25
|
#4
|
|
Infrequent Poster
Join Date: Aug 2011
Location: Gwynedd
Posts: 184
Car(s): Saxo VTS | Defender 90 | Kawasaki ZX6R
|
The roll pin is a tapered pin that secures the control arm to the gearbox. It fixes to a spindle that goes into the gearbox and then conducts some kind of voodoo magic that makes your gears work. (or so the Haynes manual says) and quite often can wear and lead to play in your gearstick. It is an interference fit which means it must be knocked in and out with a hammer and punch, simple enough as it only needs a short sharp shock to slide it out but as it’s down the back of the gearbox it’s a bit more tricky.
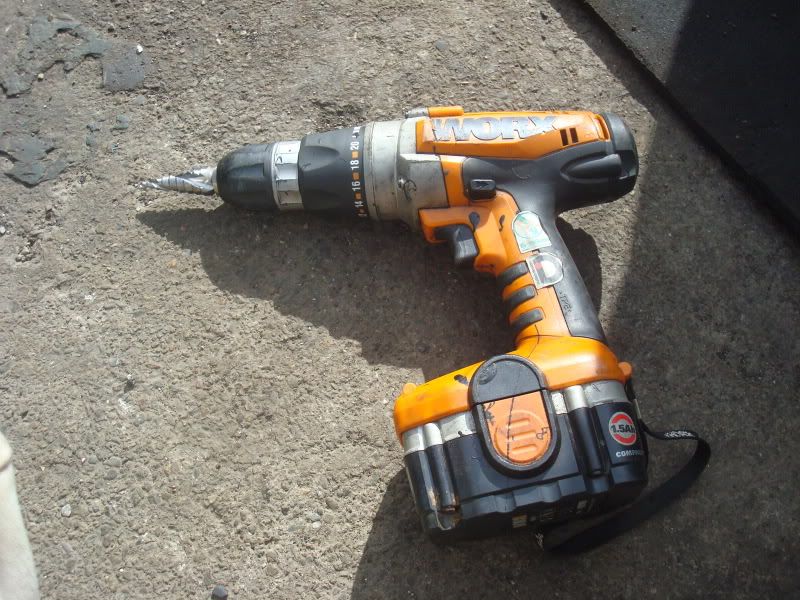
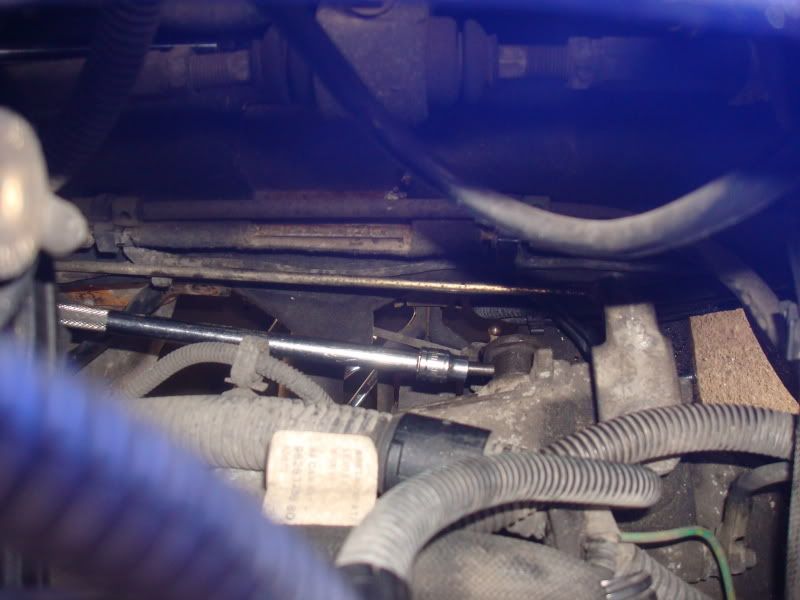
Probably a hundred and one ways to do it but I used a 5mm allen key bit on a long extension to begin removing it:
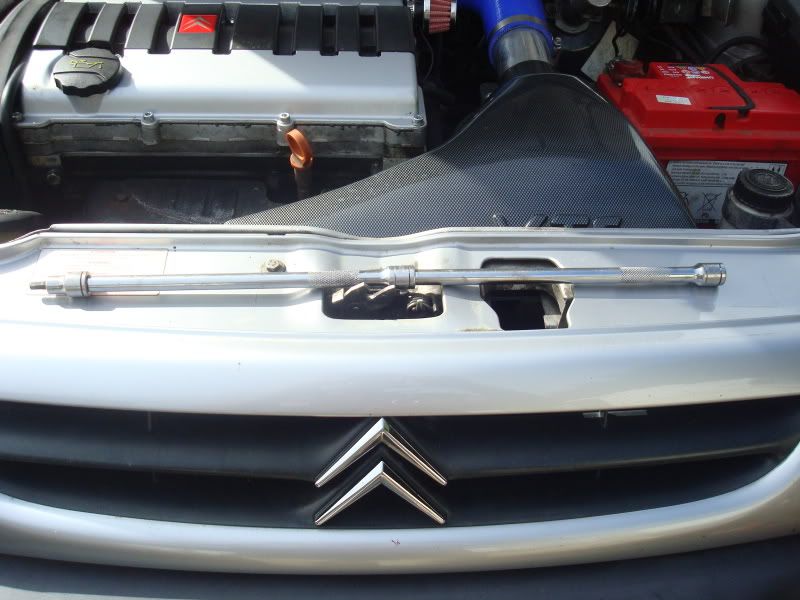
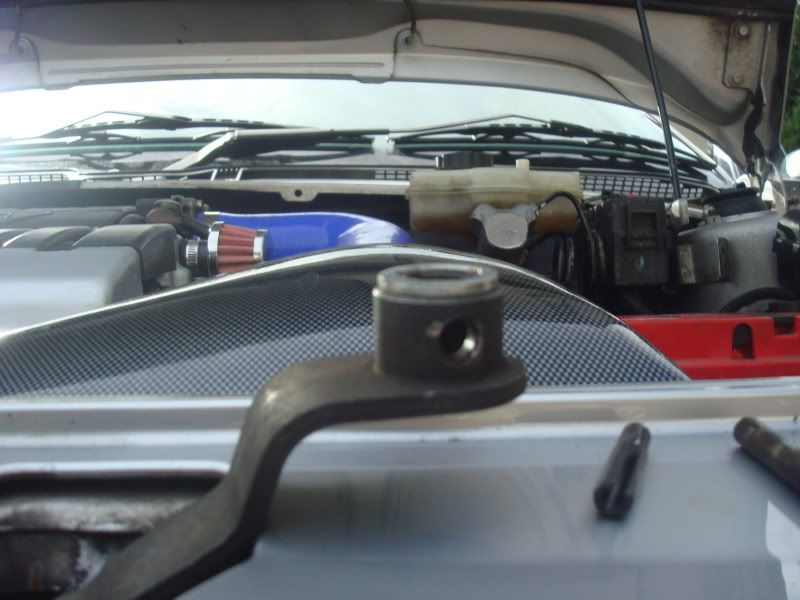
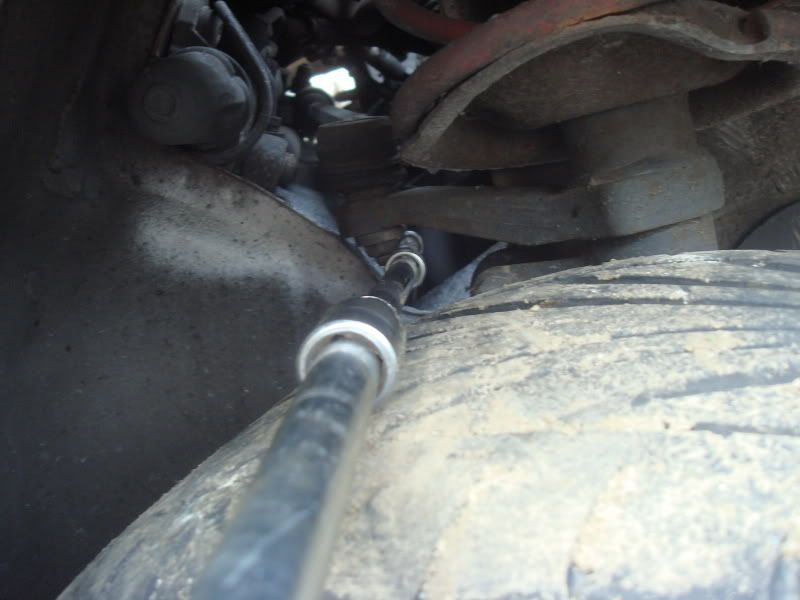
Through the gap in the passenger side wing underneath the track rod you can just about get a straight enough line to line up with the pin:
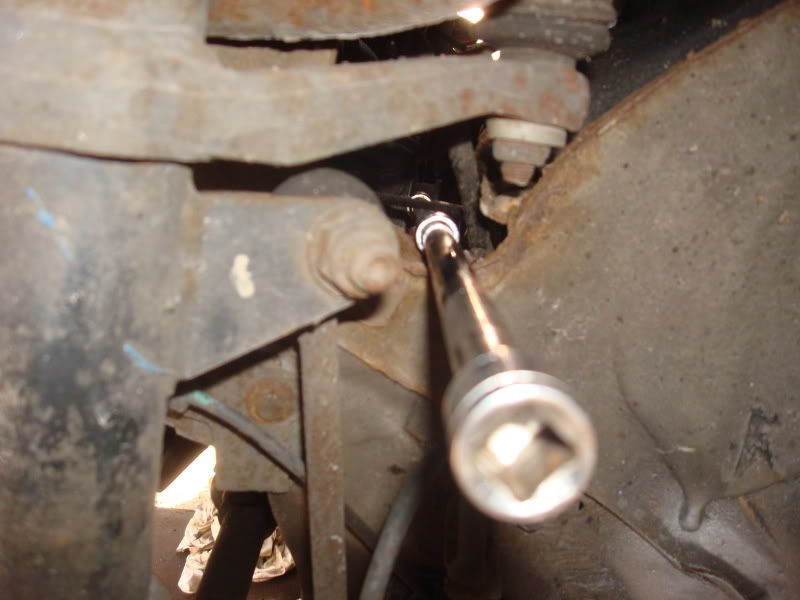
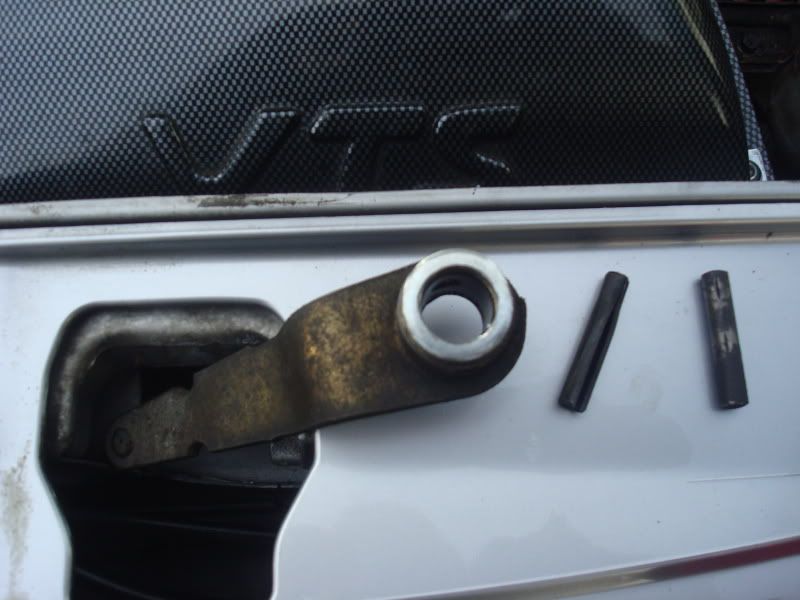
Make sure it’s properly lined up before you give it a twat and you should get this, the old pin is ¾ of the way out in this picture:
Once it’s completely out the arm can be slid off completely, here with the old and new pins:

It was at this point I discovered a problem. My roll pin didn’t actually look that bad, I was expecting it to have a big groove in the middle where it had worn and allowed the arm to move, but it was actually alright. I checked again and it turned out the spindle the arm sits on was moving in and out, not the arm itself. This is a bit of a bugger as it means the main cause of the play is in the gearbox itself, not something I fancy trying to fix because of the voodoo magic I mentioned earlier.
As I didn’t want to try taking the box apart and fixing all the clockwork inside just to get rid of a little bit of play in the gearstick I had another idea. If I could make sure the spindle didn’t have room to slide in it would take out the play almost completely and ‘fix’ the problem.
A bit of a bodge may be, but I drilled out a thick M12 repair washer to the diameter of the spindle. If you need to do this it would be worth using a good quality washer to avoid it wearing down quickly, and you’ll need a HSS step or cone drill to do it like mine:
The new spacer on the arm:
The spacer slid over the spindle perfectly and it was the right size to sit in the recess the arm was sliding into to stop it moving:
Then the arm on, the spacer was just the right thickness, you don’t want a washer too thick as you won’t get the holes to line up, and if you need to force the roll pin in the arm will lock and won’t rotate smoothly.
The new roll pin inserted into the hole:

And now I needed to do the same trick, a longer extension from the other side with a socket on was enough to knock the new pin into the arm:
And it’s in! There’s a tiny bit of in and out movement but that’s only because I wanted to leave a bit of room so it could turn, it’s miles better than the good few mm it could move beforehand.

So the worst of my problems fixed, a simple solution and a bit fiddly to do but it does the job fine.
__________________
VTS PROGRESS THREAD! TEAM DYNAMICS PRO RACE 2 TOYO PROXES T1RS 60MM GMAX SHOCKS & SPRINGS 283MM BREMBO 4 POTS SPARCO STRUT BRACE MTEC DRILLED & GROOVED DISCS GMC QUICKSHIFT RACELAND & K&N INDUCTION MAGNEX STAINLESS SYSTEM
|
|
|
|
|
The Following 4 Users Say Thank You to Darkslider For This Useful Post:
|
|
|
26th September 2011, 21:25
|
#5
|
|
Infrequent Poster
Join Date: Aug 2011
Location: Gwynedd
Posts: 184
Car(s): Saxo VTS | Defender 90 | Kawasaki ZX6R
|
So with the fiddly bit over and done with all that’s left is to refit the new bits! As I’m waiting for my uprated linkages I’ve refitted the old ones for now, but the worst of the play was in the gearbox arm, the selector rod and the ball on the control return so with those all sorted there’s a massive difference. Not even sure I needed the uprated rods, but there is a tiny bit of play still in each one so I’ll still put them on when they get here just for the finishing touch.
So the control return arm and selector rod are fitted back together, all moving parts, cups and sockets are coated in grease just to make everything feel smooth:
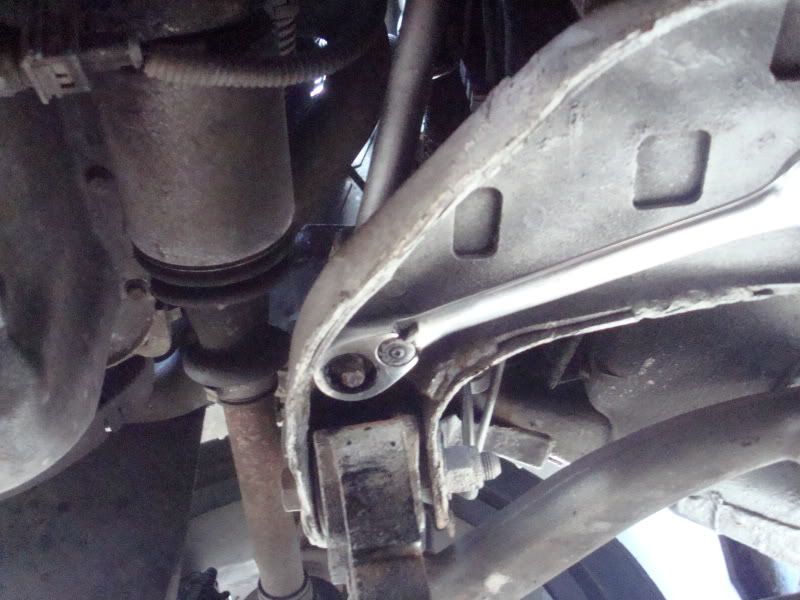
Not forgetting to refit and tighten the diagonal brace to the wishbone mount:
The old gear rods all popped on by hand with a bit of grease, though I’ll fit my uprated ones as soon as they arrive. With everything reassembled and working fine the car can be dropped down and the inside put back together:
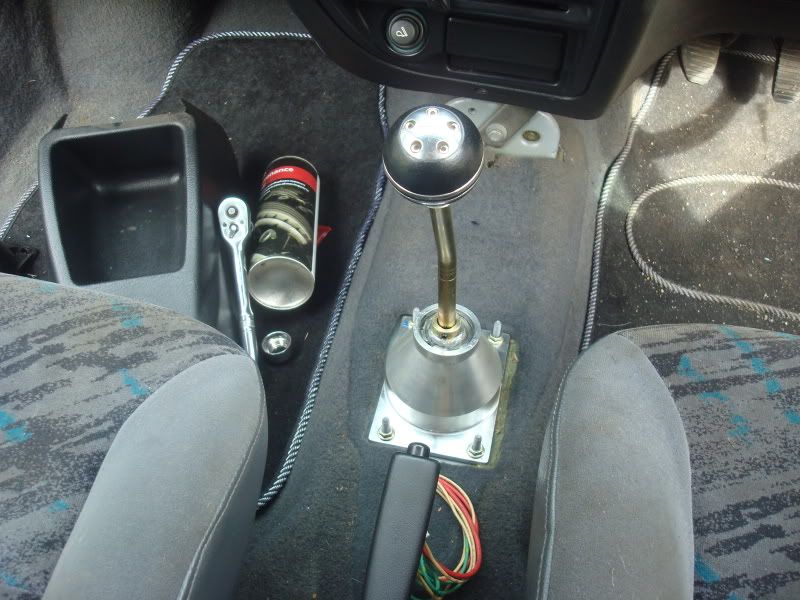
The quickshift adjustment is by the two locking collars on the lever. The lever can be set at any height in the housing to adjust the throw, I played around with mine to get it how I wanted it, then when I was happy a drop of loctite on each of the grub screws and a final tightening up made it nice and solid.
I cut the back off the old lever housing to act as the bracket for the centre console, with the housing and console re drilled it can be fitted back as it was before:
Then window switches, gaitor and knob back on with loctite again and that’s it!
The difference between the new and old gearchange is night and day, a massive improvement and definitely worth doing if you’re planning on track days or fast driving. I’ve never driven a Satchshift fitted car but with how this feels now I’m not sure I can see the point!
__________________
VTS PROGRESS THREAD! TEAM DYNAMICS PRO RACE 2 TOYO PROXES T1RS 60MM GMAX SHOCKS & SPRINGS 283MM BREMBO 4 POTS SPARCO STRUT BRACE MTEC DRILLED & GROOVED DISCS GMC QUICKSHIFT RACELAND & K&N INDUCTION MAGNEX STAINLESS SYSTEM
|
|
|
|
|
The Following 6 Users Say Thank You to Darkslider For This Useful Post:
|
|
|
26th September 2011, 21:26
|
#6
|
|
Saxperience Hardcore!
Join Date: Nov 2007
Location: Guantanamo Bay
Posts: 28,700
Car(s): oyster card
|
You missed out the most common course of gearstick wobble being the worn split pin on the gear selector on the gearbox.
Williamvts made a guide on this years ago on drilling it out and fitting a larger one.
EDIT: you're too quick with your copy n paste posts lol there was only one post there a second ago!
Good detailed guide, will be alot of help for many people.
__________________

|
|
|
|
|
26th September 2011, 21:36
|
#7
|
|
Saxperience Forum Bum
Join Date: Jun 2011
Location: Abermule, Mid Wales.
Posts: 2,763
Car(s): Corsa Rally Car & Fiesta ST
|
Very good guide mate 
i really need to do this on mine, doing it however, is a completely different matter haha.
|
|
|
|
|
26th September 2011, 21:48
|
#8
|
|
Established Member
Join Date: Oct 2009
Location: Birmingham
Posts: 2,073
Car(s): Current - 56 1.9 astra Sri
Owned - 54 C2 GT.
Ow
|
Good guide dude, Was a very good read
__________________
Mobile Auto Diagnostic and Service Repairs in Midlands
Inbox for further details.
|
|
|
|
|
26th September 2011, 22:16
|
#9
|
|
Frequent Poster
Join Date: May 2011
Location: Bradford on Avon,Nr Bath
Posts: 866
Car(s): '01 astra coupe
|
Great guide mate, need to do mine as soon as and this is really going to help
|
|
|
|
|
27th September 2011, 00:07
|
#10
|
|
Saxperience Forum Bum
Join Date: Nov 2010
Location: England
Posts: 3,415
Car(s): Old: Two Tone VTR
New: C2 VTS Code
|
Quality guide, very detailed!
Should be a sticky!
I should need to replace the main shaft and the ball some time soon, i'm 99% sure thats why my box slips out of gear 2 when hammering it round bends/ roundabouts.
|
|
|
|
|
27th September 2011, 21:17
|
#11
|
|
Regular Poster
Join Date: Feb 2011
Location: Milton Keynes aka Milk & Beans
Posts: 320
Car(s): Citroen Saxo VTS
|
Great guide mate, another great guide like when u went into great detail wit the brembo's to try an stop my fookin squealing!! Keep it up Bud!!
Jon
|
|
|
|
|
27th September 2011, 23:12
|
#12
|
|
Infrequent Poster
Join Date: Aug 2011
Location: Gwynedd
Posts: 184
Car(s): Saxo VTS | Defender 90 | Kawasaki ZX6R
|
Thanks guys, dunno about stickying or getting added to guides would I need to ask a mod for that? I've put it in the premium section anyway so it should stay there for a bit! Been a delay with getting my uprated gearlinkages from pug1off as the Raceland manifold I ordered them with was out of stock, but they should be arriving soon I hope!
__________________
VTS PROGRESS THREAD! TEAM DYNAMICS PRO RACE 2 TOYO PROXES T1RS 60MM GMAX SHOCKS & SPRINGS 283MM BREMBO 4 POTS SPARCO STRUT BRACE MTEC DRILLED & GROOVED DISCS GMC QUICKSHIFT RACELAND & K&N INDUCTION MAGNEX STAINLESS SYSTEM
|
|
|
|
|
28th September 2011, 00:31
|
#13
|
|
Infrequent Poster
Join Date: Oct 2010
Location: Cornwall
Posts: 236
Car(s): 2001 Saxo VTR
|
Good guide m8  . The bit with the spacer is the most interesting part for me as I've got a leak from the selector arm like you said can move in and out (in my case a lot of movement), I'll give this a go
|
|
|
|
|
28th September 2011, 21:07
|
#14
|
|
Regular Poster
Join Date: Sep 2011
Location: Wirral
Posts: 280
Car(s): desire
|
Thanks for a great guide, made my first job a hell of a lot easier.
|
|
|
|
|
28th September 2011, 21:45
|
#15
|
|
Infrequent Poster
Join Date: Aug 2011
Location: Gwynedd
Posts: 184
Car(s): Saxo VTS | Defender 90 | Kawasaki ZX6R
|
Not sure about it leaking from that selector arm, mine was fine so I don't know how you'd go about sealing it as it needs to rotate as well. You could try siliconing the spacer in but you might find it just stops it rotating. Pleased I've been able to help a few people anyway
__________________
VTS PROGRESS THREAD! TEAM DYNAMICS PRO RACE 2 TOYO PROXES T1RS 60MM GMAX SHOCKS & SPRINGS 283MM BREMBO 4 POTS SPARCO STRUT BRACE MTEC DRILLED & GROOVED DISCS GMC QUICKSHIFT RACELAND & K&N INDUCTION MAGNEX STAINLESS SYSTEM
|
|
|
|
|
28th September 2011, 21:49
|
#16
|
|
Established Member
Join Date: Oct 2009
Location: Birmingham
Posts: 2,073
Car(s): Current - 56 1.9 astra Sri
Owned - 54 C2 GT.
Ow
|
Got a quick question regards my box actually, One of my linkages catches on the chassis of the car, Its the linkage that is above the control arm that you took off, Its connected to a arm that goes into the top of the box, What would cause it to catch the chassis of the car as makes changing gear hard unless I am speeding up at a decent speed, Could it be the lower engine mount......?
would get pics but my photobucket ain't working
__________________
Mobile Auto Diagnostic and Service Repairs in Midlands
Inbox for further details.
|
|
|
|
|
28th September 2011, 22:57
|
#17
|
|
Newbie
Join Date: Mar 2010
Posts: 20
|
Where is the best place to purchase the quickshift parts? Sounds like it's worth it and I'm looking for an excuse to do some work on the saxo.
|
|
|
|
|
29th September 2011, 08:35
|
#18
|
|
Infrequent Poster
Join Date: Aug 2011
Location: Gwynedd
Posts: 184
Car(s): Saxo VTS | Defender 90 | Kawasaki ZX6R
|
After a bit of looking around I got my quickshift from GMC: http://www.gmcmotorsport.co.uk/clutc.../prod_482.html
And the linkages from Pug1Off:
http://www.shop.pug1off.com/product_...00a6ebb46d12fa
These seem to be the cheapest places to get them, the rest of the linkage parts are only available from a Citroen or Peugeot main dealer as far as I'm aware 
And as for the linkage knocking on the car I've no idea, maybe you've managed to bend one of the arms it's attatched to, if the control arm is bent back that could cause it. Mine had loads of clearance so yeah it's possible if you have a worn engine mount it's allowing too much movement, couldn't tell without looking!
__________________
VTS PROGRESS THREAD! TEAM DYNAMICS PRO RACE 2 TOYO PROXES T1RS 60MM GMAX SHOCKS & SPRINGS 283MM BREMBO 4 POTS SPARCO STRUT BRACE MTEC DRILLED & GROOVED DISCS GMC QUICKSHIFT RACELAND & K&N INDUCTION MAGNEX STAINLESS SYSTEM
Last edited by Darkslider; 29th September 2011 at 08:41.
|
|
|
|
|
29th September 2011, 09:09
|
#19
|
|
Saxperience Addict
Join Date: Dec 2009
Posts: 11,709
Car(s): A4 SE/A6 Le Mans
|
Quote:
Originally Posted by db_sax

You missed out the most common course of gearstick wobble being the worn split pin on the gear selector on the gearbox.
|
That's the very common cause on pugs and citroens for more time than I care to remember. I had a 305 with that problem, then a 106. Then a saxo but had to change the transmission so took care of that pin at the same time.
Good guide
|
|
|
|
|
29th September 2011, 14:04
|
#20
|
|
Regular Poster
Join Date: Sep 2011
Location: Wirral
Posts: 280
Car(s): desire
|
Just sorted mine, Bolt at lever/linkage was loose, tightened that and it took a lot of the play out, fitted the Baker BM quickshift........what a difference, no more stretching for first, greased the rest of the linkage points and gave it a whirl. Not perfect but fitting new linkages soon so that will tighten the rest up. 
|
|
|
|
 Posting Rules
|
You may not post new threads
You may not post replies
You may not post attachments
You may not edit your posts
HTML code is Off
|
|
|
All times are GMT. The time now is 06:11.
|


 Linear Mode
