Here is a step by step guide to wiring and fitting Mk2 angel eyes...
What do you need?
A set of mk2 angels

A crimp set or electrical junction boxes can be used
Electrical/waterproof tape
Wire cutters/strippers
Socket set with 10mm socket
Flat head screwdriver
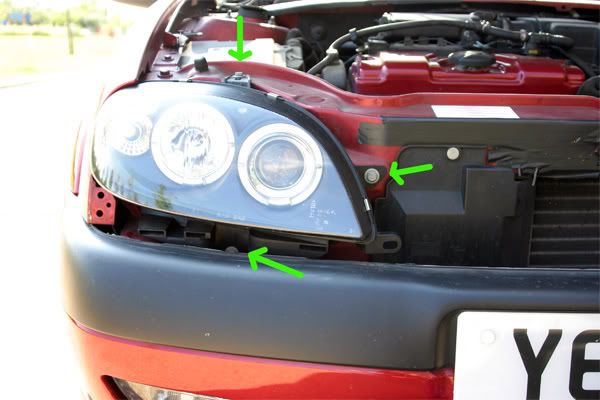
Removing the plastic trim from under the lights:
First things first you need to lift up the bonnet.. if you don't know how to do that you don't have the skills needed to fit the angels

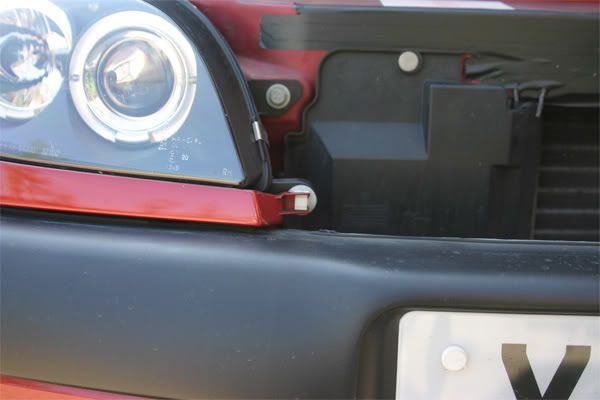
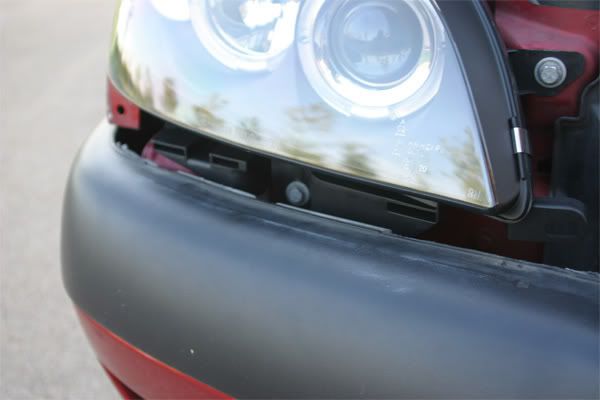
Then we need to remove the plastic trim stips from underneath the headlight.. they are head in with three plastic clips, two clips connect it to the wing and one clip holds it to the headlight...Here you can see the clip that connects the trim to the headlight...
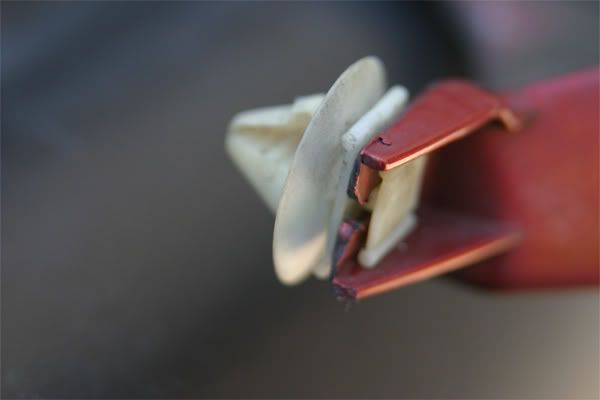
Remove the clip that connects it to the headlight.. the best thing to do is to pull it slightly then slot the flathead screwdriver between the clip and the headlight unit and twist.. it should pop the clip out like this...
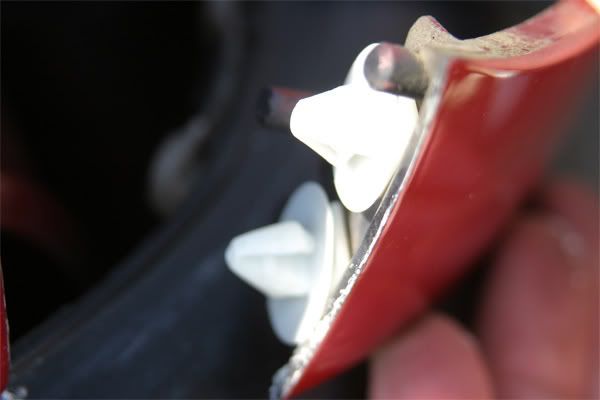
Next we need to remove the two clips securing the trim to the wing, these are rather fidly to remove... you need to pull them gently straight out towards you when your facing the car.. they need to be pulled out straight or you'll snap the retaining tabs... as you pull them out a gap will be formed between the trim and the wing.. you can fit the screwdriver in and prize the clips out as before... (don't worry too much about snapping clips as they are easily replaced.. just dont break the trim!)
 Removing/fitting the headlight itself:
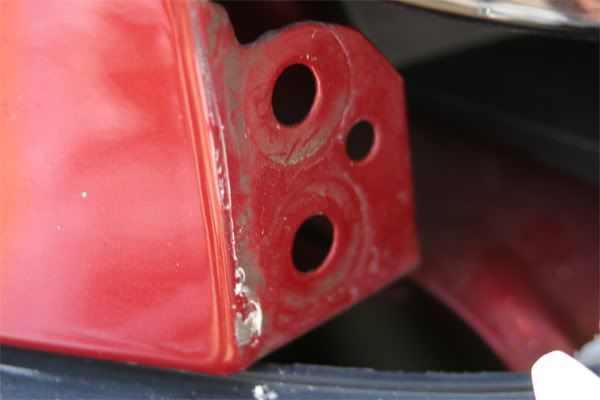
Now the trim has been removed you should be able to see the three retaining bolts (10mm) for the headlights...
I would recommend removing the bottom one first as it's the most awkward to remove.. you can bend the bumper down slightly whilst doing it... but be gentle and try to avoid this if possible...
Once all the bolts are removed place them in a safe place... then the fiddly part is wriggling the light out.. lift the tab on top of the headlight up slightly, there is a small tab that clips it on.. once this is lifted the unit should wriggle out.. you need to take it straight out towards you.. as there are locating lugs on the bottom of the headlight, you also need to squeeze the bottom of the headlight unit over the bumper that's an extremely tight fit... i recommend you take your time being as gentle as possible remember once the light is free from the car the wiring is STILL ATTACHED so be careful...
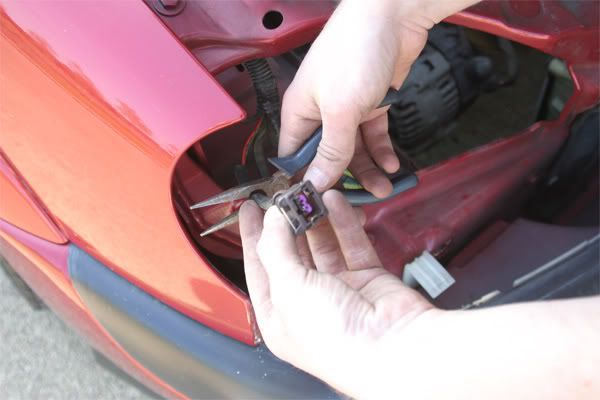
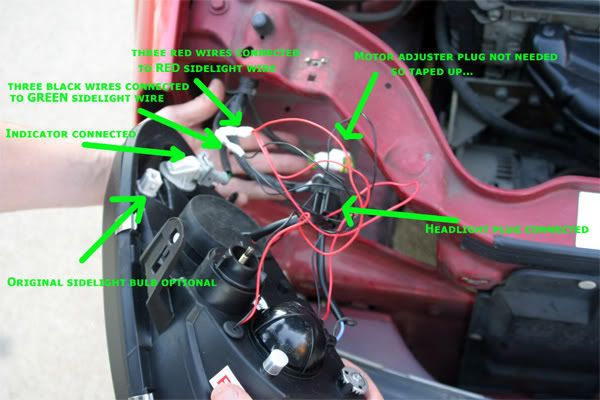
Once the light is free disconnect all wiring clips... you need to disconnect the indicator plug (grey/white), the sidelight plug(brown), the main headlight plug(black) and the motor adjuster plug(small black and yellow plug)...
To remove the sidelight and indicator plug you need to prise off the wire clip with a flat head screwdriver then they just slide off.... the main headlight plug just pulls straight out... and the adjustor motor clip needs the tab pushing in whilst sliding it out...
That's the headlight free from the car!!!
The wiring part!
Preparing the car wiring:
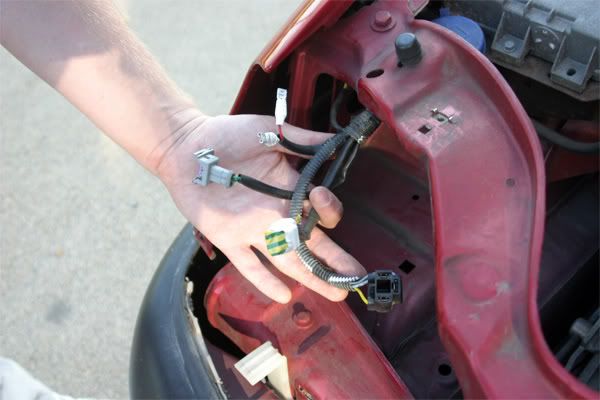
Cut the end off the sidelight connector leaving about 5cm of wire behind the plug...
Then strip the ends of the wires and attach female crimps to the original sidelight wires... then wrap electrical tape around the back of the crimp to ensure it is secured and waterproof...
Cover the end of the motor adjuster plug in electrical tape as this is NOT required for angel eyes as they are manually adjusted...
Take note the
GREEN WIRE = NEGATIVE/EARTH and the
RED WIRE=POSITIVE/LIVE
The wiring should now look like this.. all ready for the headlight to be connected up..
 Preparing the angel eye wiring:
Ok before doing this you need to decide what you want to use as your sidelights... angels have four possible sidelights.. there is an LED and the top of the light, the standard sidelight bulb, and two halo rings.. each one is wired in seperately so you need to decide what you want to wire in..
When wiring in these i have wired up the two halo rings and the LED, i have put my standard sidelight bulbs in but NOT wired them in..
Twist the three black wires together and connect a male crimp, twist the three red wires together and connect a female crimp.. apply electrical tape to the back of the crimp to ensure it's water tight...
Optional extra: if you want your original sidelight bulb to function aswell, connect up the three red wires and the RED positive of your original sidelight plug and crimp them together... then connect up the three BLACK wires and the negative of your original sidelight wire and crimp them together.. then connect the sidelight plug..
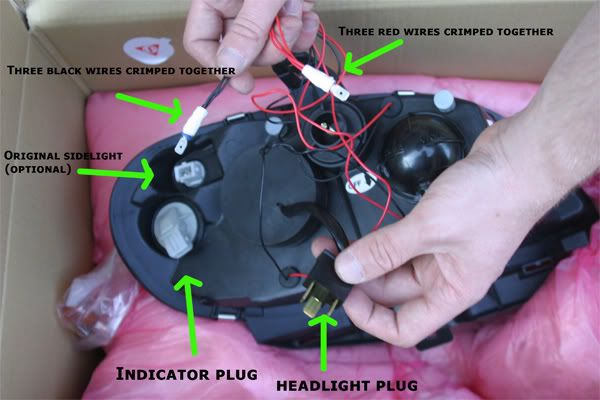
That's the light prepared and ready to fit!
Connecting up the wiring!
Offer the light up to the car and connect all of the wiring... ensuring that the crimps are connected
RED -
RED and BLACK -
GREEN
Once the crimps are connected tape over them completely so they are fully waterproof...
The wires should all be connected as seen here:
I would strongly recommend testing the bulbs at this stage to ensure everything is working correctly.. so you don't have to keep fitting and removing the headlight...
Refitting the headlight:
Follow the reverse of the headlight removal stage to reconnect the headlight, be careful when fitting the headlights not to snap the top tab...
Make sure the bolts are fastened securely but don't overtighten them..
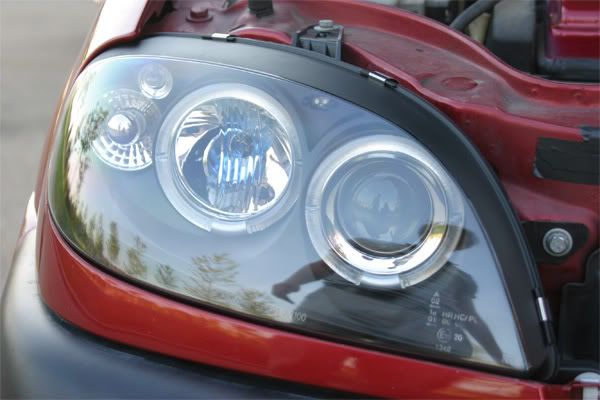
It should look something like this:
Then the plastic trim can be refitted below the light by simply pushing the clips in... attach the side to the wing first...
Ensure all tools etc. are removed from the engine bay.. close the bonnet and admire your hard work...
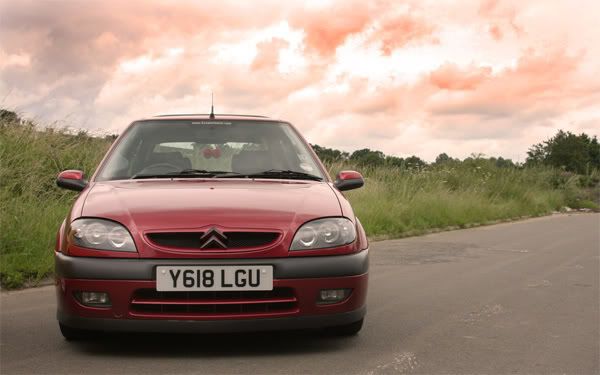
Job's a good'un!
Hope that helps!
Alex
 Some more information for you:
Broken Clips:
Some more information for you:
Broken Clips:
If you managed to snap some of the clips from the headlight trims when removing them they are easily accessable on ebay... from an ebay shop called 'paragonpug'.. they are called "PEUGEOT DOOR MOULDING CLIPS 106,206,207,306,EXPERT"
Here is a direct link to the item:
http://cgi.ebay.co.uk/ws/eBayISAPI.d...m=250151235173
Steamed up lenses:
If fitting your angel eyes on a hot day you shouldn't have any problems with the lenses steaming up.. if you notice over time that the lenses of the angel eyes becomed steamed up when in use (especially during cold whether) there is a simple solution!
Remove the rubber cover from the back of the headlight (covers back of headlight).. hold a hair dryer in the back of the headlight until the air inside the headlight is warm, this will make any water vapour inside the light condense and escape the light... then refit the rubber plug before allowing it to cool.. this should prevent any further steaming up issues
 Bulbs / bulb upgrades:
Angel's use
H1 type bulbs..
DO NOT use HID kit's in them as they will melt the plastic lenses..
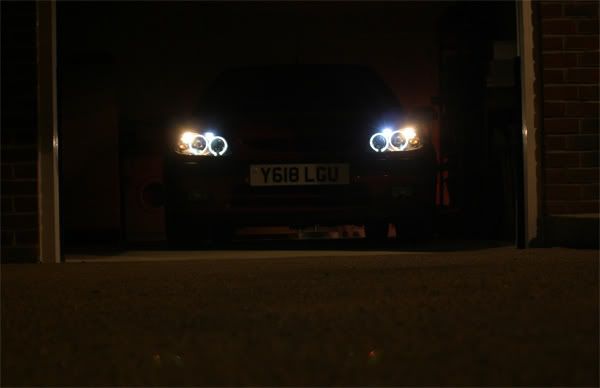
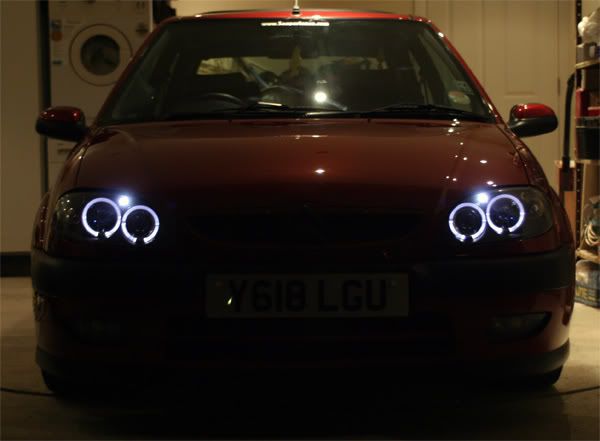
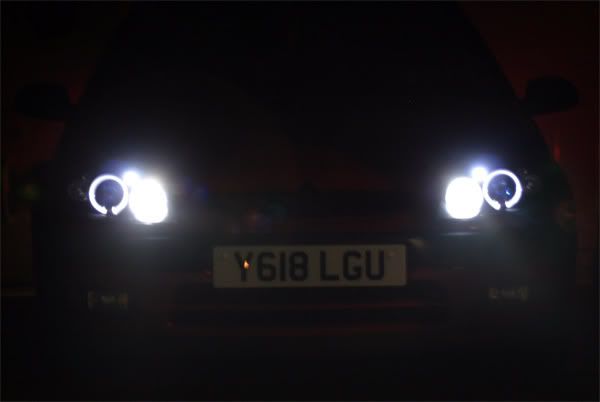
Angel's come as standard with halogen bulbs.. but xenon upgrades are available.. that omit 50% more light... i have an Xenon upgrade on mine - you can see the blue bulbs... i will post up some pictures of the xenons at night so you can compare them to the standard bulbs...
These can normally be purchased as an add-on package to the angel eyes...
Indicator bulbs:
The angel eyes themselves are supplied with orange standard bulbs, but with the angel eye's clear lenses the orange bulb stands out and looks out of place... Silvatec indicator bulbs can be bought, the bulbs are silver in appearance but glow with an amber tint.. they are FULLY road legal and E-marked...
These can normally be purchased as an add-on package to the angel eyes... or
www.rimstyle.com sell them..
Changing/replacing the headlight bulbs:
Sadly i don't have any photo's of this process.. but here is a little guide to swapping over the headlight bulbs... Also remember not to touch the glass part of the bulb when fitting new bulbs.. as grease on your fingers can perish them...
Firstly distinguish which bulb you are trying to access...
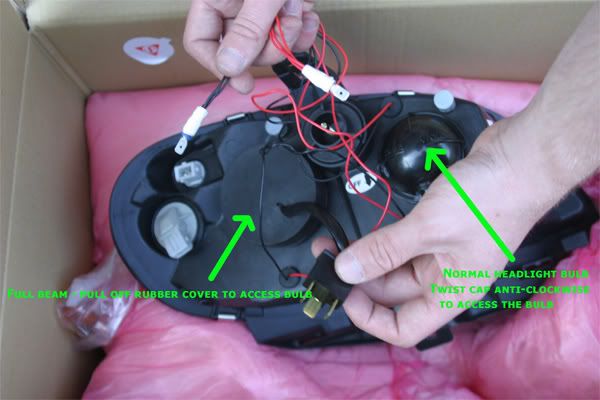 The normal headlight bulb:
you have to twist the round cap.. it's really stiff.. twist it anti clockwise to undo i believe.. i think it has an arrow on it..
It will slip round abought a 3rd of a turn.. then it can be pulled off..
Then you will see a spring loaded metal wire clamping the bulb in.. you need to push the wire down and to the side to unhook it.. once you've unhooked it you should be able to pull the bulb and wiring out of the unit...
Then you need to pull back the rubber insulation coats off the crimps then un attach the crimps from the bulb and replace bulb.. and do the complete opposite to put it back together... the crimps will be a really tight fit and are rather fidly to get out...
The full beam headlight bulb:
Remove the rubber cap on the back of the headlight...
Then you will see a spring loaded metal wire clamping the bulb in.. you need to push the wire down and to the side to unhook it.. once you've unhooked it you should be able to pull the bulb and wiring out of the unit...
Then you need to pull back the rubber insulation coats off the crimps then un attach the crimps from the bulb and replace bulb.. and do the complete opposite to put it back together... the crimps will be a really tight fit and are rather fidly to get out...


 i can return to being my usual unhelpful self


 your the best!


 Linear Mode

