| Non Saxo Photos / Videos / Progress Reports Please share photos/videos of your non saxo in this forum. |
 |
|
 5th October 2016, 15:22
|
#501
|
|
Established Member
Join Date: Dec 2007
Location: Redcar, Middlesbrough
Posts: 2,285
Car(s): 16v Rallye S2
|
Right Willsy Its been July since the last update
I'm gagging for an update I've followed it since the beginning. we're due an update surely ?
__________________

|

|

|
|
6th October 2016, 19:03
|
#502
|
|
West Midlands
Join Date: Nov 2005
Location: Nuneaton (West Mids)
Posts: 13,835
Car(s): '64 Volvo V40 RDesign, '89 Ph1 309 GTi, 97 Mk1 S
|
Evening Rob,
Yes there is some slight progress on this (I'll collate it over the weekend and get it posted up- currently in Italy but returning home tomorrow)
Progress has been slow partly due to the weather being too good. The Deox gel needs at least 30 minutes really to do its thing removing the rust on the rear. The problem that I've had is that the garage does get very warm in Summer even with the doors open which has meant that the gel is drying out within 15/30 minutes.
I have however bought another project to tinker with over the last few months
Rest assured the 309 progress shall continue with some pace this week. Feeling fresh and ready for some more onslaught to tackle the 309
|
|
|
|
|
7th October 2016, 09:46
|
#503
|
|
Established Member
Join Date: Dec 2007
Location: Redcar, Middlesbrough
Posts: 2,285
Car(s): 16v Rallye S2
|
Looking forward to it buddy!
__________________
|
|
|
|
|
11th November 2016, 14:27
|
#504
|
|
Established Member
Join Date: Dec 2007
Location: Redcar, Middlesbrough
Posts: 2,285
Car(s): 16v Rallye S2
|
I've been waiting over a month now bud!
 no pressure
__________________
|
|
|
|
|
11th November 2016, 17:35
|
#505
|
|
Established Member
Join Date: Aug 2012
Posts: 2,009
Car(s): Saxò VTS 16v
|
LOL
yeah 458 chacs
|
|
|
|
|
30th November 2016, 13:32
|
#506
|
|
Saxperience Post Whore
Join Date: Mar 2009
Location: Uppingham, Rutland
Posts: 9,569
Car(s): mk1 JP4'd VTR, '16 Fabia Monte Carlo
|
Dammit I was all excited
|
|
|
|
|
10th January 2017, 15:28
|
#507
|
|
Established Member
Join Date: Dec 2007
Location: Redcar, Middlesbrough
Posts: 2,285
Car(s): 16v Rallye S2
|
still waiting!
__________________
|
|
|
|
|
11th January 2017, 23:20
|
#508
|
|
West Midlands
Join Date: Nov 2005
Location: Nuneaton (West Mids)
Posts: 13,835
Car(s): '64 Volvo V40 RDesign, '89 Ph1 309 GTi, 97 Mk1 S
|

Good evening everyone, and a belated Happy New Year.
Apologies for the lack of any update during the latter part of 2016, generally there wasn't any. I'd bought another project to occupy me for a couple of the hotter summer months whilst it was too hot and impractical to continue with the rust removal on the 309 rear end (too hot, gel dries out too quickly) however that projects been a pain in the ass, and sapped a lot of time.
Anyway I've restarted on the 309 from where I left off. From the previous update I was beginning to tidy up the passenger side of the boot floor.

One thing that's become increasingly apparent is that originality with the factory stone chip really isn't feesable to get hung up on with this restoration. The truth of it is that the old finish is failing and so is the original galvanazed coat underneath. Anyone who thinks they have a mint 309 underneath would be sadly disappointed. There's bits that I'd cleaned which looked in good order but in cleaning back the boot floor most of it has been removed, for the greater good.
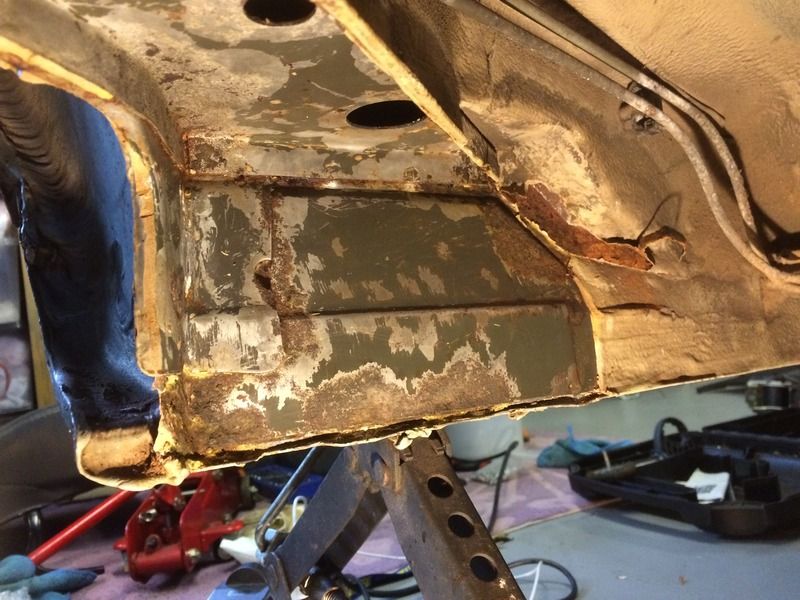
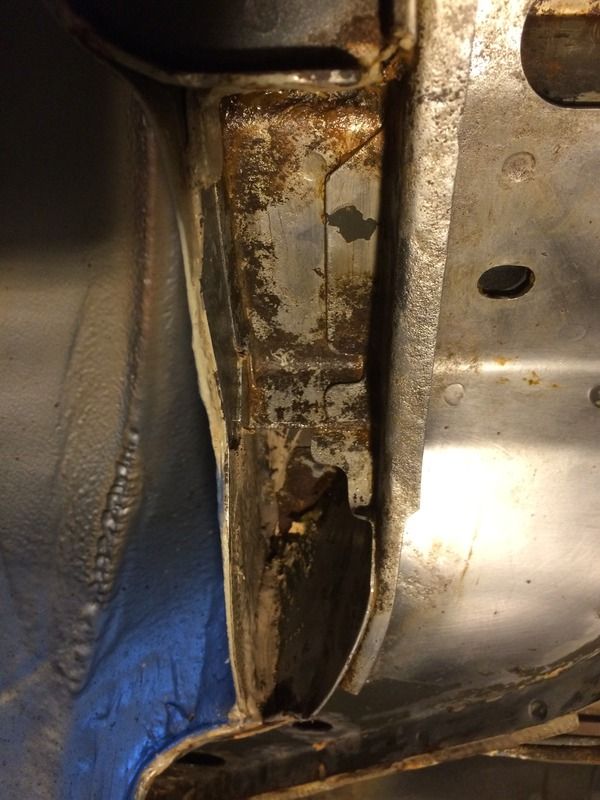
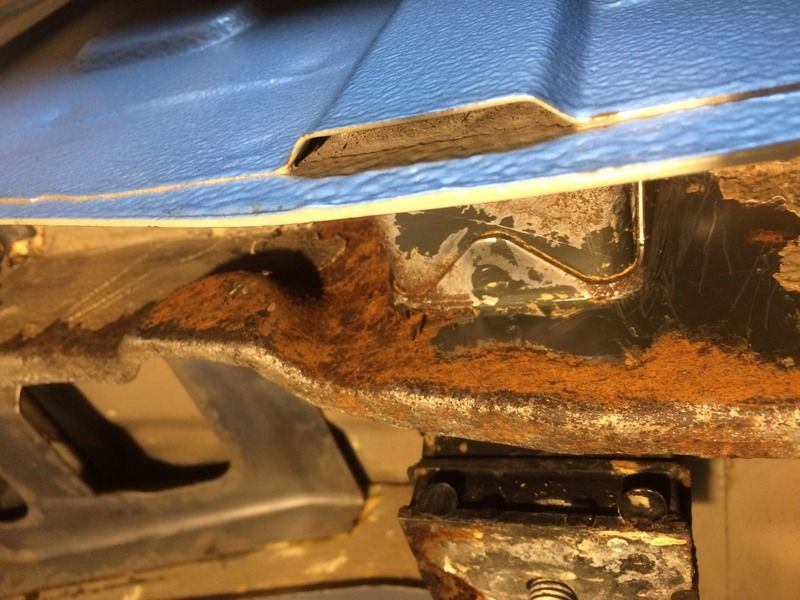
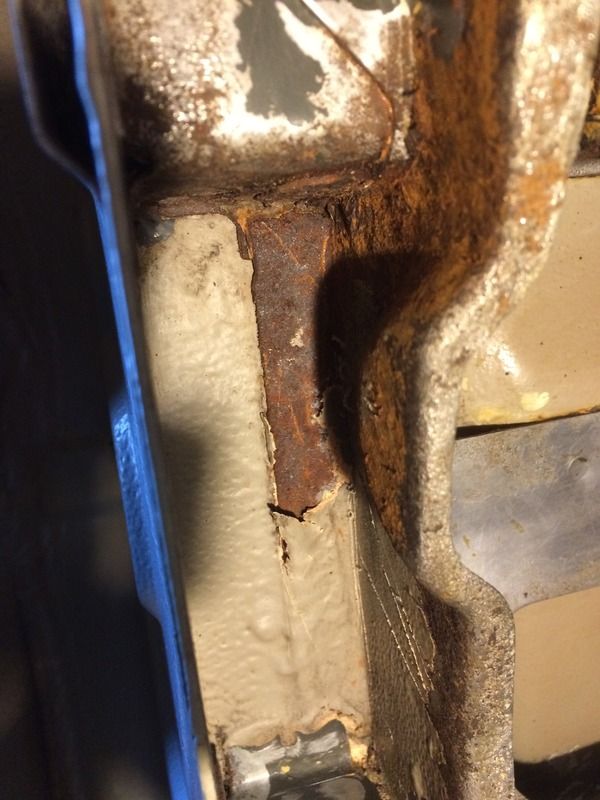
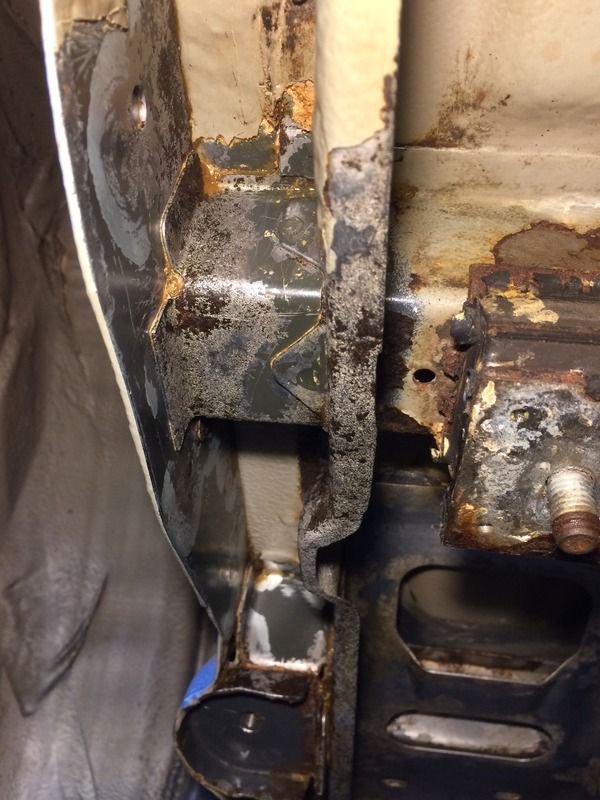
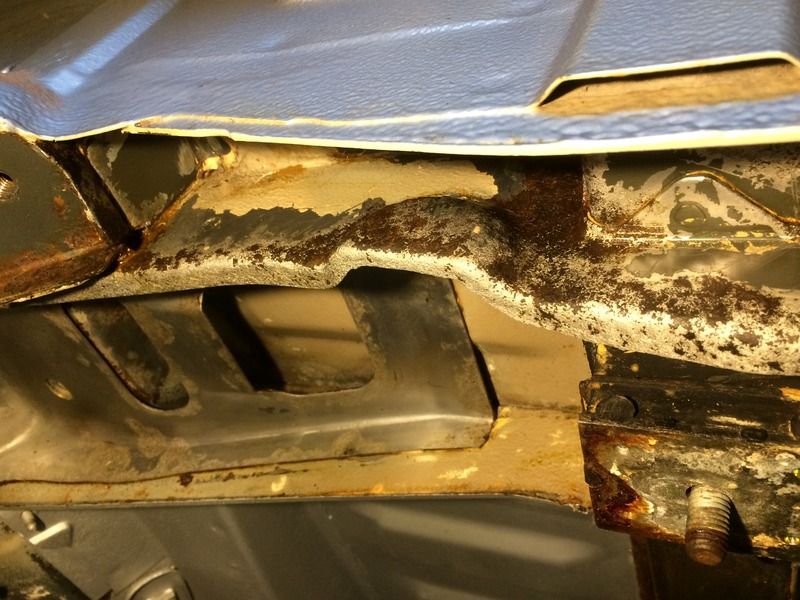
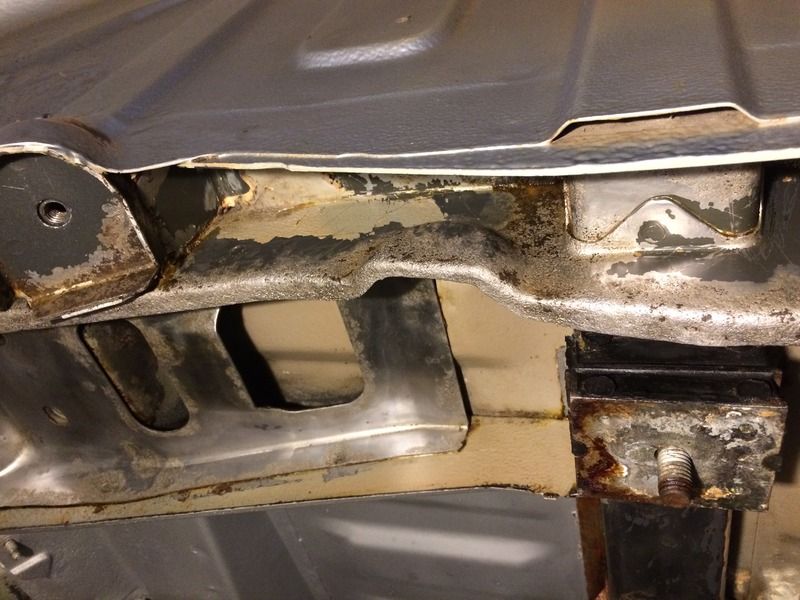
These bits for example all appeared to be unbroken clean factory stone chipped areas. After some digging I've unearthed some welding requirement. This is a common area either side of the fuel tank which, from some horrors that I have seen, I think this has been captured VERY early
Passenger side
Looks harmless??

Needs attention
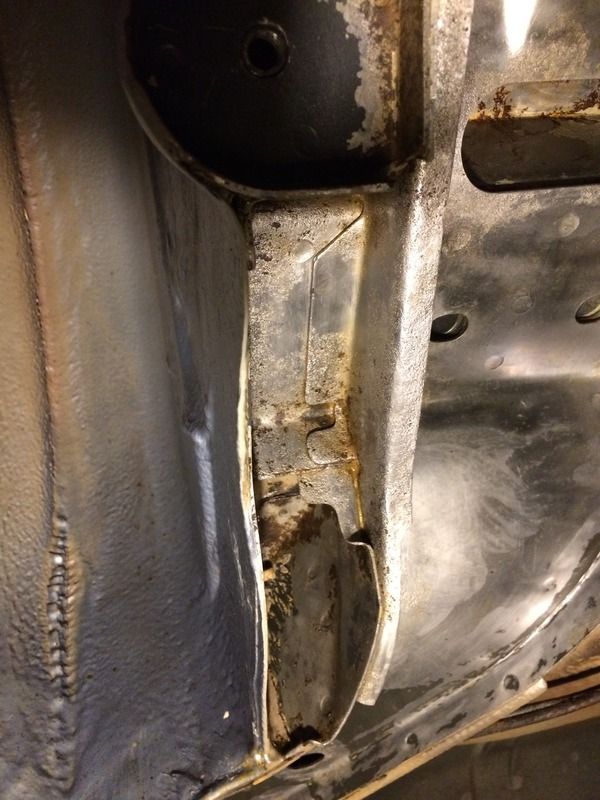
The worse, drivers side

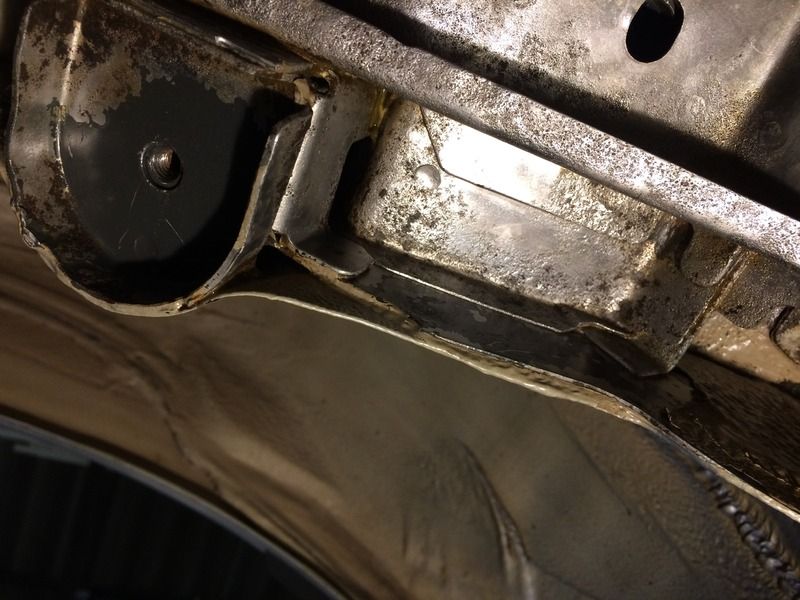
Those areas can be sorted soon. In the meantime I'm focusing on the areas which are obstructed for access if the rear suspension was fitted.
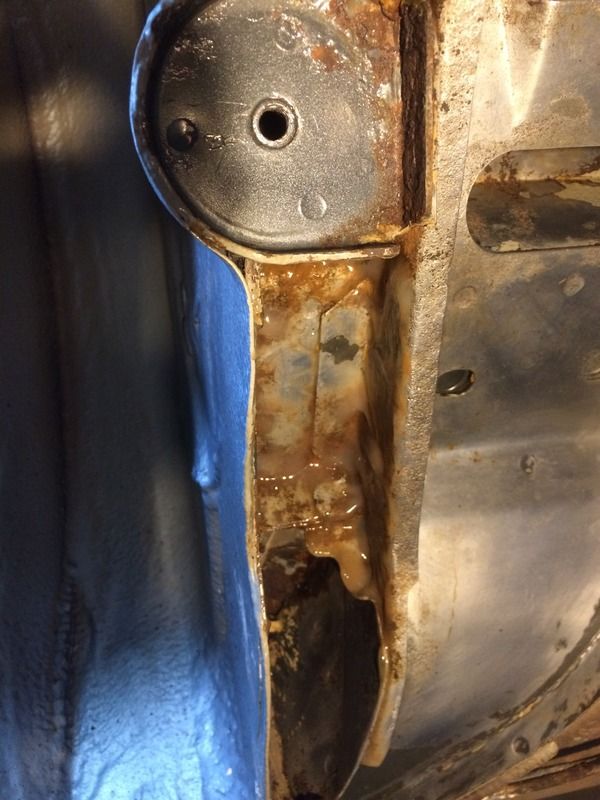
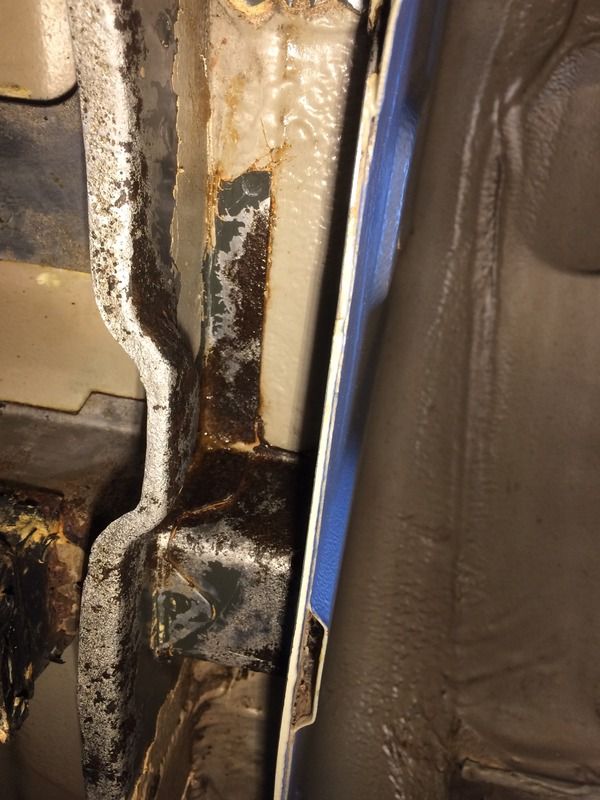
Back into this area
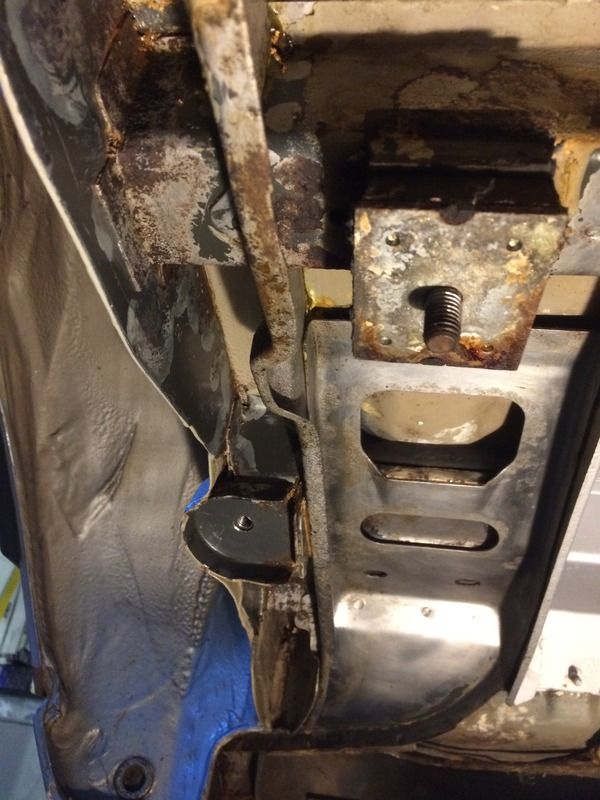
Another example of 'what lurks beneath' the right hand side here was coated in some lovely factory stone chip just minutes before this pic
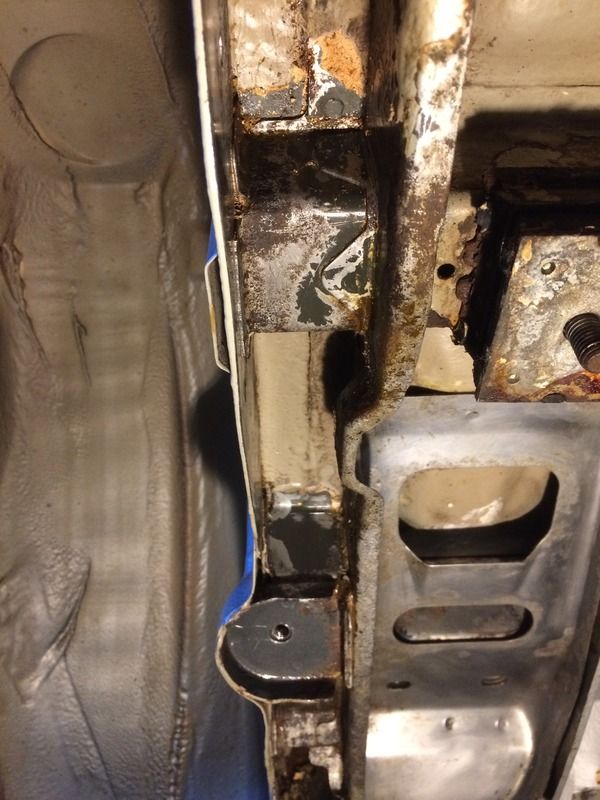
So on with the Bilt Hamber Deox Gel again
This really is a painfully slow process. It's so tight in these box sections that no substantial tools can fit in to aide the process, I'm also of the frame of mind that I don't want to remove good material unnecessarily in the process; these areas look like they could/would be a real pain to have to replace any with new material.
This really is my working tool box at the moment. A scribe set for picking at loose rust. Deox gel and a small rotary tool size wire cup and wire wheel to use on the drill where it'll fit
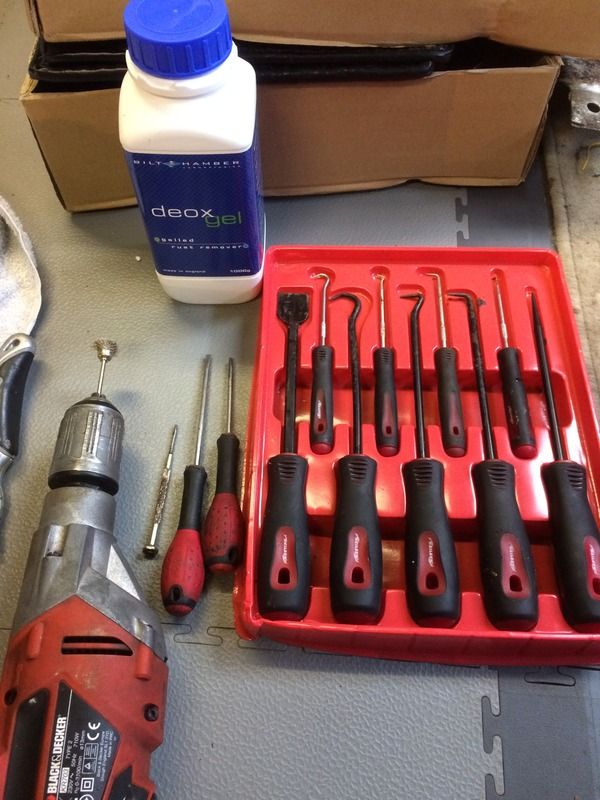
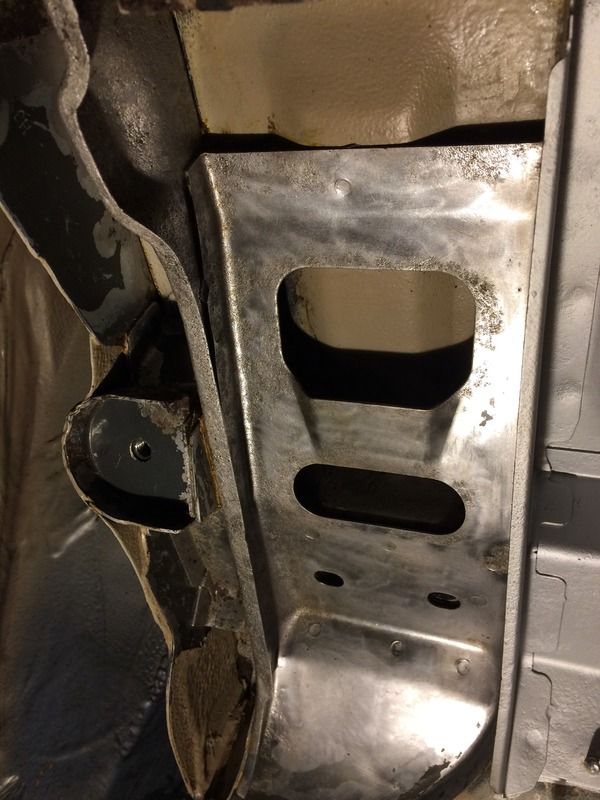
So working in cycles my next day commenced with 3 hours worth of scratching at loose surface rust with the scribe set and screwdrivers. That followed with 2 hours worth of Deox Gel working its magic whilst I did some housework to pass the time.
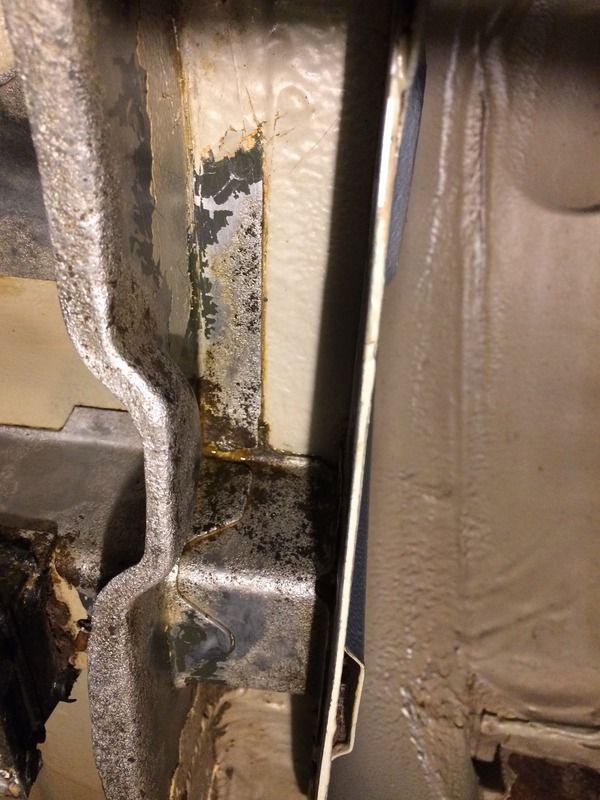
This is the same area as above after the first application of gel
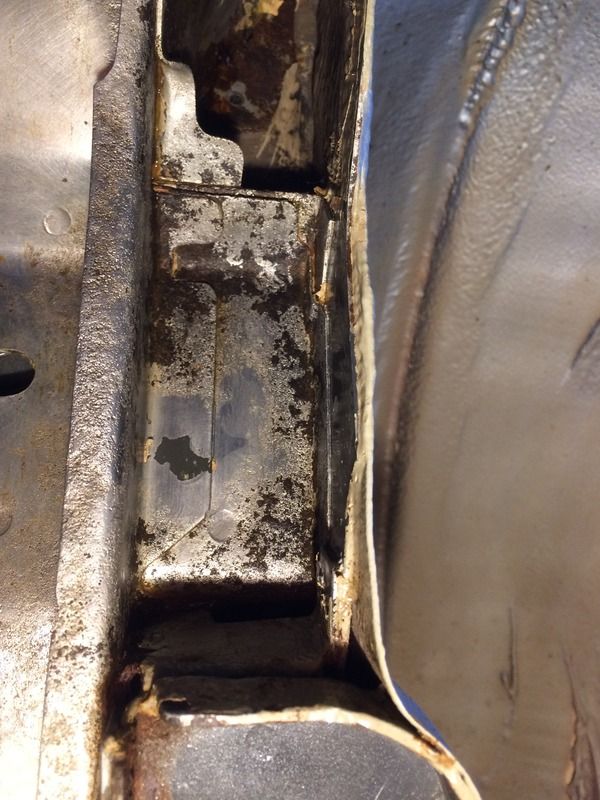
I've then spent another 2-3 hours scraping again at some of the stubborn areas and picking at some of the pitted bits with the scribe. This is as far as I got yesterday
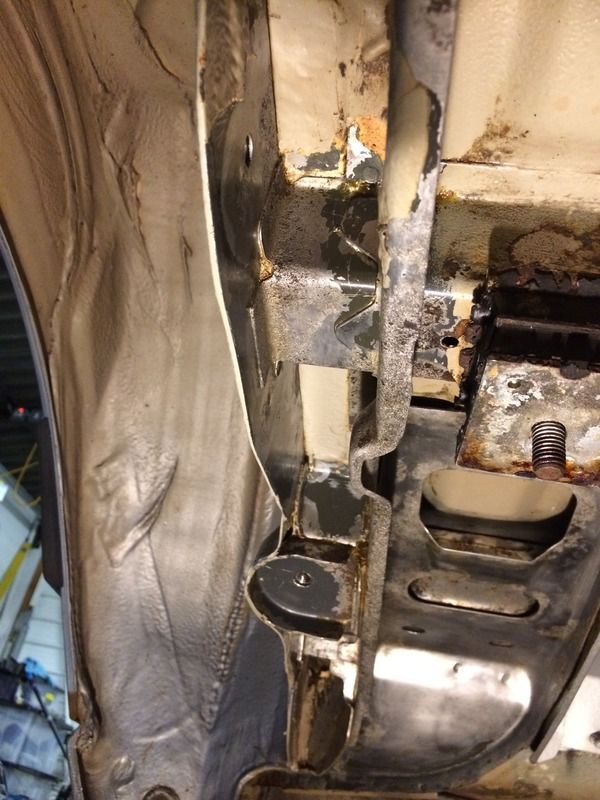
There's still plenty more hours of work to go into the rear end. Bare with me, I'll get onto more exciting stuff at some point hopefully :-)
|
|
|
|
|
The Following 2 Users Say Thank You to willsy For This Useful Post:
|
|
|
11th January 2017, 23:30
|
#509
|
|
West Midlands
Join Date: Nov 2005
Location: Nuneaton (West Mids)
Posts: 13,835
Car(s): '64 Volvo V40 RDesign, '89 Ph1 309 GTi, 97 Mk1 S
|
Over the next few days I have a dent guy booked for Friday so I'm hoping he can get all of the small car park dents out of the rear quarters so they're up to scratch. That'll then enable me to fully fit the interior as much of it has been loose fit for ages in anticipation that access is going to be needed behind the doorcards etc at some point.
More rust removal pics of course
And I'll take some pictures of all elements of the car, just as an 'as it stands' gallery to start 2017.
|
|
|
|
|
12th January 2017, 11:09
|
#510
|
|
Regular Poster
Join Date: Feb 2016
Location: manchester
Posts: 256
|
Sounds torture doing all that rust removal! Fair play for sticking at it.
|
|
|
|
|
12th January 2017, 14:02
|
#511
|
|
Established Member
Join Date: Dec 2007
Location: Redcar, Middlesbrough
Posts: 2,285
Car(s): 16v Rallye S2
|
__________________
|
|
|
|
|
8th January 2018, 20:21
|
#512
|
|
North West
Join Date: Apr 2009
Location: Warrington, Cheshire
Posts: 5,733
Car(s): PH2 Peugeot 106 "race" car - Currently in pieces
|
Almost 12 months have gone by... Any progress?
|
|
|
|
|
4th September 2018, 17:11
|
#513
|
|
West Midlands
Join Date: Nov 2005
Location: Nuneaton (West Mids)
Posts: 13,835
Car(s): '64 Volvo V40 RDesign, '89 Ph1 309 GTi, 97 Mk1 S
|
Afternoon all, apologies for being slow on the updates. There have been a couple on Detailing World, but heres a copy/paste of the latest ones for you
..............................
Apologies for the lack of any update during the latter part of 2016, generally there wasn't any. I'd bought another project to occupy me for a couple of the hotter summer months whilst it was too hot and impractical to continue with the rust removal on the 309 rear end (too hot, gel dries out too quickly) however that projects been a pain in the ass, and sapped a lot of time.
Anyway I've restarted on the 309 from where I left off. From the previous update I was beginning to tidy up the passenger side of the boot floor.
One thing that's become increasingly apparent is that originality with the factory stone chip really isn't feesable to get hung up on with this restoration. The truth of it is that the old finish is failing and so is the original galvanazed coat underneath. Anyone who thinks they have a mint 309 underneath would be sadly disappointed. There's bits that I'd cleaned which looked in good order but in cleaning back the boot floor most of it has been removed, for the greater good.
These bits for example all appeared to be unbroken clean factory stone chipped areas. After some digging I've unearthed some welding requirement. This is a common area either side of the fuel tank which, from some horrors that I have seen, I think this has been captured VERY early
Passenger side
Looks harmless??
Needs attention
The worse, drivers side
Those areas can be sorted soon. In the meantime I'm focusing on the areas which are obstructed for access if the rear suspension was fitted.
Back into this area
Another example of 'what lurks beneath' the right hand side here was coated in some lovely factory stone chip just minutes before this pic
So on with the Bilt Hamber Deox Gel again
This really is a painfully slow process. It's so tight in these box sections that no substantial tools can fit in to aide the process, I'm also of the frame of mind that I don't want to remove good material unnecessarily in the process; these areas look like they could/would be a real pain to have to replace any with new material.
This really is my working tool box at the moment. A scribe set for picking at loose rust. Deox gel and a small rotary tool size wire cup and wire wheel to use on the drill where it'll fit
So working in cycles my next day commenced with 3 hours worth of scratching at loose surface rust with the scribe set and screwdrivers. That followed with 2 hours worth of Deox Gel working its magic whilst I did some housework to pass the time.
This is the same area as above after the first application of gel
I've then spent another 2-3 hours scraping again at some of the stubborn areas and picking at some of the pitted bits with the scribe. This is as far as I got yesterday
There's still plenty more hours of work to go into the rear end. Bare with me, I'll get onto more exciting stuff at some point hopefully :-)
Sent from my iPhone using Tapatalk
|
|
|
|
|
4th September 2018, 17:14
|
#514
|
|
West Midlands
Join Date: Nov 2005
Location: Nuneaton (West Mids)
Posts: 13,835
Car(s): '64 Volvo V40 RDesign, '89 Ph1 309 GTi, 97 Mk1 S
|
Afternoon folks, apologies for the delay in a meaningful update. Busy year so far but with most of my non car related to do list being conquered its time to get upto date on here, and prepare for some more graft.
First up is a quick catchup of the rear end rust removal progress. As I left off from the last update, I was working on a bit of the boot floor box section. It is a bit finicky on these old Pugs.
Last update you were left with this pic...

Well I progressed a bit and managed to get some of the box section back to bare metal, treated any pitted bits (just to make sure all the rust was sorted) with Bilt Hamber Hydrate80, then gave a liberal few coats of Zinc rich Bilt Hamber Electrox over the top.
That should keep it in decent order for a good while. I didnt get much done on the boot floor area. Its so time consuming at this stage id decided that it would best to do small sections at once to get it coated ASAP rather than having larger areas of metal bare for a prolonged period.
Heres where I got to


Once Ive done all the donkey work here itll be easier to do the stone chip over coating in more or less one sitting I hope.
At this point Id had enough of lying down under the car so opted to move onto the next task for a bit.
Next update following shortly - rear suspension rebuild
Sent from my iPhone using Tapatalk
Sent from my iPhone using Tapatalk
|
|
|
|
|
4th September 2018, 17:16
|
#515
|
|
West Midlands
Join Date: Nov 2005
Location: Nuneaton (West Mids)
Posts: 13,835
Car(s): '64 Volvo V40 RDesign, '89 Ph1 309 GTi, 97 Mk1 S
|
Next up then, rear suspension time.
Having removed the rear beam assembly from the car there was no way that it would be going back on in the same condition.

Que a complete strip down

Its just as well that I did strip it down as a common item of wear found on 205/309s (or indeed many Peugeots/Citroens of the same era using a Torsion bar setup) is the bearings, when they get so tired and dry they tend to collapse and just eat their way into the shafts causing excess play, camber and inevitably an MOT fail & a big fat repair bill
The left shaft here being particularly bad where the outer bearing sits

Trailing arms were completely stripped down. Both the main shafts and the hub pins are to be replaced

Removing the old bearings from the main suspension tube was next. Outer ones have no easy way of removal so to begin the inner race was easily flicked out with a screwdriver as it it was obliterated anyway, then that just left the outer casing to shift.
Many guides online seem to suggest bludgeoning it with an old screwdriver so that it collapses in on itself and will simply come out.
I felt that there was less control with that method and more chance of leaving some damage on the tube itself. Therefore with a dremmel and mini grinding disk I carefully cut through the bearing outer casing until a hairline crack appeared. Then it was easy with a light tap to crack the casing and pull it out with ease


The inner bearing was easy enough to remove as its situated some way inside the main tube. Inserting one of those old worn shafts which were now pressed out of the trailing arms are useful in that their diameter is small enough to sit against the bearing then with a piece of wood tap the bearing out through the tube (not the best description unfortunately, but equally impossible to take a pic of)
Next up was to clean the splined areas of the tube and the trailing arms where the torsion bars sit in. Again handy dremmel and mini wire wheel attachment works wonders


Then it was off for blasting, zinc under coat and powder coat for most of the parts
I gathered together other bits which were originally zinc plated and sent those off to ElectroplateUK too

Sent from my iPhone using Tapatalk
Sent from my iPhone using Tapatalk
|
|
|
|
|
4th September 2018, 17:17
|
#516
|
|
West Midlands
Join Date: Nov 2005
Location: Nuneaton (West Mids)
Posts: 13,835
Car(s): '64 Volvo V40 RDesign, '89 Ph1 309 GTi, 97 Mk1 S
|
Gradually parts then started arriving back from being powder coated.
First up was the torsion bars. I wanted as close a match as possible to the original deeper (red oxide?) shade

The eagle eyed or those with a Pug/Cit background may have noticed that the bars are originally are marked with a yellow ring. One bar has 1 ring, the other has two. I dont know if theres any difference other than as a drivers/passenger marking about it, however continuing with the attention to detail I measured the rings and their positions before sending them for powder coat, and replicated them upon return

The next bit is where the dampers sit in and is a link between the main tube and the rear mounting bushes. The factory finish for these I couldnt find anywhere to replicate as its like a zinc leaf finish (again I havent got a clue how to describe it otherwise) anyway best I could do was a light grey metallic. The silver looked a bit cheap

Trailing arms finished in satin black and reassembled next with new shafts & pins

The main tube also satin black at the ends with a JCB yellow centre tube. It looks bright in this pic due to the flash but the darker JCB yellow is much closer to the original appearance.

In order to refit the inner bearings to the tube I needed something a bit less archaic. I decided to use the wooden handle of an old gardening tool and used a hole cutter to create some pvc discs to fit on the end which were tough enough to tap the bearing in, yet wouldnt damage it

Bearing sat on top

The other brackets and bits and bobs also returned from ElectroplateUK

And then I started to fit it all together. Ill setup the height when its back on the car but for now its sitting pretty in the corner of the garage


Sent from my iPhone using Tapatalk
Sent from my iPhone using Tapatalk
|
|
|
|
|
4th September 2018, 17:19
|
#517
|
|
West Midlands
Join Date: Nov 2005
Location: Nuneaton (West Mids)
Posts: 13,835
Car(s): '64 Volvo V40 RDesign, '89 Ph1 309 GTi, 97 Mk1 S
|
Morning all,
Last minor update whilst Im still on holiday. (Although it has still taken many hours to do accurately)
One of my jobs to do is to adapt the two new genuine front wings that I have in order be the correct spec. A daunting task considering there are no GTI ones left, and it took long enough to find a matching pair of wings from an earlier model. From memory my Parts Genie Craig only found one other genuine wing in Europe and that was a Phase 2...
Whilst the shape of the wing itself remained the same throughout production of the 309, there were three notable differences between model years, and with spec.
1) There was an entirely plain wing with no side repeater
2) There was a slightly later Phase 1 which did have a side repeater implemented which was located just in front of the door mirror, but slightly lower around the height of the top of the wheel arch

3) Then the phase 2 wing changed again with the side repeater moving further down as seen below

So my first job was to use a template drawing (as handily added to the Haynes manual) and cut this shape into my two new wings 

Using a few select drill bits and various dremmel attachments I dived in. I spent a LOT of time ensuring that my template was good, and that it was accurately placed


Next up, being a GTI meant that Id have a further three holes to drill on the lower part of the wing where the GTIs side trim fits in.
Again plenty of measuring was required


Sent from my iPhone using Tapatalk
Sent from my iPhone using Tapatalk
|
|
|
|
|
4th September 2018, 17:32
|
#518
|
|
Saxperience Forum Bum
Join Date: Dec 2012
Location: Perth
Posts: 3,663
Car(s): Peugeot 106 1.1 Turbo
Peugeot 106 1.5D Turbo
Peuge
|
Excellent 
A bit more involved than drilling a poverty spec S1 106 wing to take Rallye arches! Which I'm not looking forward to.
__________________
The rain kept a trollin'
|
|
|
|
|
4th September 2018, 18:53
|
#519
|
|
Infrequent Poster
Join Date: Mar 2018
Location: Wirral
Posts: 151
Car(s): 106 GTI -
106 GTI shell -
New 106 Rallye shell
|
loving the attention to detail  great restoration work so far.....just out of curiosity, roughly how much was it for all the brackets and bolts to be electroplated ? did they take long to be done? . Im looking to have a few things done myself.
|
|
|
|
|
4th September 2018, 20:43
|
#520
|
|
West Midlands
Join Date: Nov 2005
Location: Nuneaton (West Mids)
Posts: 13,835
Car(s): '64 Volvo V40 RDesign, '89 Ph1 309 GTi, 97 Mk1 S
|
Quote:
Originally Posted by karl_mh

loving the attention to detail great restoration work so far.....just out of curiosity, roughly how much was it for all the brackets and bolts to be electroplated ? did they take long to be done? . Im looking to have a few things done myself. |
Cheers Karl  for everything in the picture it was £40 turnaround time within a week. ElectroplateUK were great. They dont deal with postage (but theyre happy enough to box up and stick a label on) so I had to arrange my own courier both ways which was no problem
Sent from my iPhone using Tapatalk
|
|
|
|
| Thread Tools |
|
|
| Display Modes |
 Linear Mode Linear Mode
|
 Posting Rules
|
You may not post new threads
You may not post replies
You may not post attachments
You may not edit your posts
HTML code is Off
|
|
|
All times are GMT. The time now is 08:38.
|